Echo360 PRO FAQs and How-to's
In this section
How-to
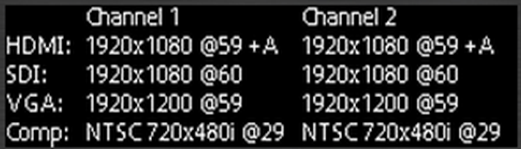
- Navigate to the Inputs Menu to see what inputs are currently connected and available for use.
- Then navigate to the Recording Menu.
- Find the option that says Audio Input and select the preferred option.
- Return to the Recording Menu.
- Find the option that says Channel 1 Input and select the preferred option.
- Return to the Recording Menu.
- Find the option that says Channel 1 Input and select the preferred option.
- The selections you made should now appear on the bottom of the Status Screen.
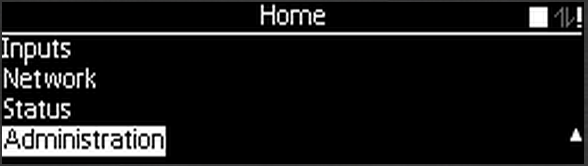
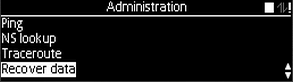
- Navigate to the Administration Menu (if available).
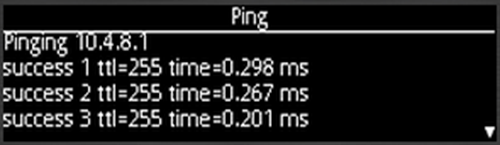
- Navigate down to 'Ping' and press Enter
- Select the applicable Ping option.

- Confirm or Enter the IP address that you'd like to ping and press Enter.
- The device will then display your Ping results.
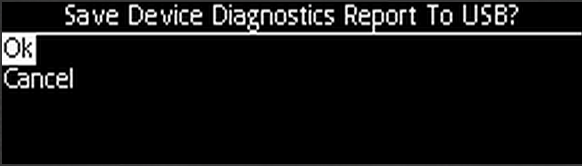
- Navigate to the Administration Menu (if available).
- Navigate down to 'Save Diagnostics Report' and press Enter.
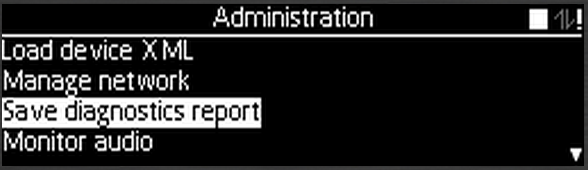
- Insert a USB drive into the device, then select 'OK'.
The PRO also allows for the ability to recover the contents of the SSD to USB media. This is a bulk recovery process and should not be used to attempt to 'save' an individual capture to USB.
- Navigate to the Administration Menu (if available) and locate the Recover Data option
- Once you have selected Recover Data, if no USB or external drive is detected, the device will display, "Please Insert USB drive" and, "Press Home to Cancel".
- If no USB or external drive is inserted, the device will time out after 30 seconds.
- If there is not enough space on the USB or external drive, the device will display, "Insufficient space. Please insert a drive with at least <size of used space on SSD> free." and it will also give you the option to, "Recover the most recent <amount of space available on USB media>". This allows you the choice to either find a USB or external drive with the amount of space needed to complete the recovery or, instead, to recover as many captures as will fit on the currently connected USB or external drive (starting with the most recent captures and working backward from there).
- Occasionally, depending on the formatting of your USB drive, the device will display, "USB drive's file system prevents files larger than 4 GB. Insert a new drive, or:" and then presents you with the option to, "Recover, skipping large files.".
- This will happen most commonly when attempting to use a USB drive that has been FAT-32 formatted. This format has a 4GB file size limit. In this type of scenario, we recommend that you use an external drive or a USB drive that has been NTFS formatted to allow for larger file sizes.
- This will happen most commonly when attempting to use a USB drive that has been FAT-32 formatted. This format has a 4GB file size limit. In this type of scenario, we recommend that you use an external drive or a USB drive that has been NTFS formatted to allow for larger file sizes.
External Drive
Please note that because this is a bulk recovery process, we recommend that an external drive rather than a USB drive be used to avoid any formatting or lack of space issues that may arise.
- If there is no space at all on the USB or external drive, the device will display, "No space on USB drive.".
- If the SSD is empty, the device will display, "Nothing to recover.".
- Once a drive has been connected to the device that has sufficient space to recover all content, the device will then display:
- "Preparing"
- "Ready to Recover" and then prompts you to, "Start Recovery"
- "Saving. Do not remove USB drive."
- "Finished. Please remove the USB drive."
Please note
Please keep in mind that this is a bulk recovery process and depending on the amount of content on the SSD, it can take several hours. We do not recommend that you attempt to use the device for capturing during this time period. The device will display a progress bar on the front panel during the process.
- If the recovery results in an "Error", please contact Technical Support.
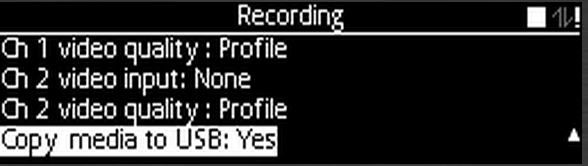
- Prior to the start of the capture, navigate to the Recording Menu then navigate to Copy media to USB and make sure 'Yes' is selected. This will allow the next capture made on the device to be saved to USB media. Please be aware that this option will default back to 'No' after the capture has completed.
- After the capture has completed, the device will display, "Please Insert USB drive" and, "Press Home to Cancel".
- If no USB drive is inserted, the device will time out after 30 seconds and you will lose the ability to copy your capture to USB. We recommend that you insert the USB drive prior to the start of the capture.
- If there is not enough space on the USB drive, the device will display, "Not enough space on USB drive. Please insert a drive with at least <size of your capture> free." and, "Press Home to Cancel".
- Occasionally, depending on the formatting of your USB drive, the device will display, "File size limited by USB drive's file system. Please insert a drive with at least <size of your capture> free." and, "Press Home to Cancel".
- This will happen most commonly when trying to save a high quality, lengthy capture to a USB drive that has been FAT-32 formatted. This format has a 4GB file size limit. In this type of scenario, we recommend that you use a USB drive that has been NTFS formatted to allow for larger file sizes.
- Once the device has detected the USB drive, it will display:
- "Preparing" and, "Press Home to Cancel".
- "Saving. Do not remove USB drive" and, "Press Home to Cancel".
- "Finished. Please remove the USB drive"
FAQs
The Echo360 PRO allows for on demand input configuration, this is a one-time only option. In order to configure the device to capture using a custom profile, all you need to do is go to the Recording Menu and select the inputs you'd like to capture (see Configure Channel Inputs in the How-To section above). The Recording Menu will then display "Custom" for the Profile.

After a recording has been captured using the custom profile, the device will automatically default back to the one-touch profile configured for use on the device configuration page (See What is the One-Touch Profile above).