Configure Input and Output for Personal Capture for Windows
In this section:
Overview
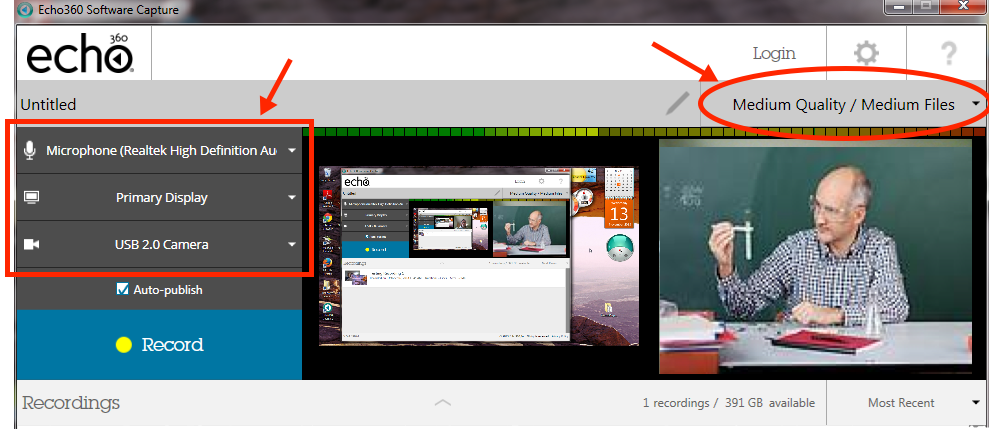
Personal Capture allows you to select the inputs you want to capture for each recording, and the output quality for the capture. The below figure identifies the locations of the drop-down lists for selecting recording inputs and capture quality output.
The input and output selections you make are retained, even after you close the program. This means you can configure these settings once and use the same ones each time you create a recording, without the need to re-select them.
Select Input for Recording
Personal Capture allows you to record up to three inputs, as follows:
- Audio only - capturing only audio input. This will generate an MP3 file for students to listen to.
- Audio and Video (A/V) - capturing sound and video input from the built in or USB-connected video camera.
- Audio and Display (A/D) - capturing sound and whatever is shown on the computer screen.
- Audio, Display, and Video (A/D/V) - capturing sound, the display on the computer screen, and video input.
- Audio and Dual Video (A/V/V) - capturing sound and the input from two different video sources.
Use the three drop-down lists, identified in the above picture on the left side of the screen, to select the inputs you want to use. Choose None Selected if applicable to that input.
Note the following about Audio input:
- You cannot choose None Selected for audio input; audio is always captured.
- You can use the internal microphone, an externally-attached microphone, or a microphone on an externally-attached camera if there is one.
- You MUST have at least one audio input. Personal Capture will not allow you to record without audio.
After you select the appropriate inputs, check the preview of those inputs shown on the screen. Each is identified in the following figure and described below the figure.
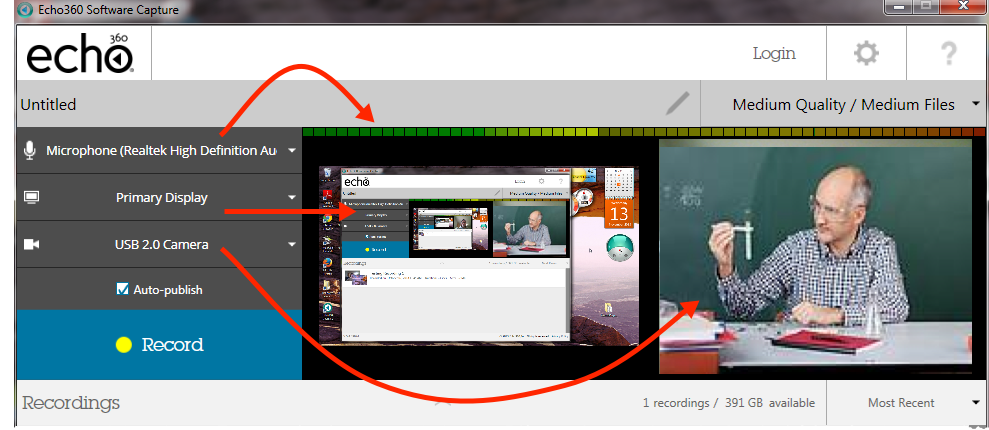
- Microphone Input is shown in the light-bar above the preview panes. If you do NOT see this bar changing as sounds are made, check your microphone connection and functionality. If the sound bar on the screen is not registering sounds, your capture may not have audio.
- Display or Second Video Input is shown in the left panel of the preview panes. Capturing Primary Display captures whatever appears on the computer screen. If you are using two video inputs, this will show whatever the selected camera is currently aimed to view.
- Primary Video Input is shown in the right panel of the preview panes. If you are not capturing video, this option will show None Selected, and the right preview pane will be blank.
Select Output Quality for Capture
The output selection drop-down list is located on the right side of the preview screen above the Primary Video preview pane. It is circled in the figure at the top of this page. This selection allows you to determine the resolution of the video and display output of the capture, which in turn determines the size of the capture files saved to your drive and subsequently uploaded to the ESS and viewed or downloaded by students.
The selections available are as follows:
- Low Quality/Smaller Files - This creates a capture with low resolution video and display. The lower resolution keeps the final file size to a minimum. This is a good choice if section quota size is a concern, or if you or your students have bandwidth issues that may cause larger file uploads or capture playback to fail.
- Medium Quality/Medium Files - This is the default setting. It generates a capture with medium resolution video and display. This setting creates medium sized files for the recording. This setting is probably sufficient for playback on most devices.
- High Quality/Larger Files - This setting creates high-definition resolution for video and display. Consequently, this setting also creates very large files for these captures. Use this setting if you have visual details in the display or video of the capture that requires students to see the recording in very high resolution. Otherwise, this setting should be used sparingly due to the time required to upload and process the completed capture. In addition, this setting uses significant computer resources; if your computer cannot process a high quality capture properly, your capture may be blank. If you DO need to use the High Quality setting, run a test capture first, to be sure it will work.
Configuring Quality Selection Settings - Advanced Users Only
The resolution defaults for Personal Capture outputs are maintained in a set of XML files installed with the program. If the resolution and other output details for the pre-configured selections are not appropriate for your situation and needs, you can manually configure these files. Changes in the XML files will change the output generated for captures made with the corresponding selection in the interface.
If you are not familiar with working in XML files, you are strongly encouraged to work with a local expert or contact Echo360 Customer Support for assistance. You must have Windows Administrator rights on the computer to alter these files.
The output quality XML files are located in the /config/ sub-folder of the Data directory identified during installation. By default this is: c:/ProgramData/Echo360/PersonalCapture/config
The directory contains the following files:
- HighRes.xml - This file controls the output resolution of the High Quality/Larger Files selection.
- MedRes.xml - This file controls the output resolution of the Medium Quality/Medium Files selection.
- LowRes.xml - This file controls the output resolution of the Low Quality/Smaller Files selection.
Each XML file contains property values that determine the capture output quality for Audio, Display, and Video inputs. If needed, you may change these files to generate different output settings for each of the selection options.
You must restart the Personal Capture application for your changes to these files to take effect.
Create Copies of the Original XML Files Before Editing
We strongly recommend that you save a copy of the original XML files, as installed, PRIOR to making changes. In the event something happens where the altered files do not work or are not generating the desired output, you will want to have the original files for the program to use. You can simply create a copy in the same directory with "_ORIG" appended to the file name. For example, MedRes_ORIG.xml.