LDAP Authentication
In this section:
Overview
LDAP (Lightweight Directory Access Protocol) allows you to use a single central source to authenticate user credentials. You can integrate the EchoSystem with LDAP so all users are authenticated. These users might be:
- System users who access the EchoSystem Server (ESS)
- Content creators who access Ad Hoc capture or upload recordings created in Personal Capture
- Students who review content already created
The distinction between system users and content users is important because, though you create a single security module, it exists as two instances:
- As the system instance (the application security module), it authenticates users logging in to the ESS administrative interface. These might be:
- A System Administrator logging into the ESS
- An Instructor using Ad Hoc capture in the classroom
- An Instructor or Teaching Assistant uploading a personal capture recording
- As the content instance (the content security module), it authorizes Academic Staff and students logging in to view content. These might be:
- Students playing an Echo.
- Students or Academic Staff accessing EchoCenter pages. When users are authorized with the content instance, you can present different EchoCenter pages for students and Instructors. If you do not authorize users with the content instance, students and Instructors both see the standard EchoCenter page.
The security module supports:
- Automatic searches of sub-trees. One part of creating the security module is configuring the tree definition fields. These fields determine how the ESS connects to the LDAP directory and what criteria are considered when a user provides credentials. The ESS searches up to three different trees and any number of sub-trees within each tree. The trees can reside on the same or different LDAP servers.
- Multiple tree failover up to three trees. If the EchoSystem does not find the user's credentials in the first tree searched, it searches two more trees.
- Fallback to the ESS database. If the user's credentials are not found in any of the LDAP trees, the EchoSystem searches its internal database. If the user's credentials are still not found, the EchoSystem refuses access.
- Security over SSL. SSL, the Secure Sockets Layer protocol, provides transport security that prevents an interloper from reading traffic.
Directory Systems Supported
The EchoSystem LDAP feature is compatible with the following directory systems:
- OpenLDAP 2.3
- Microsoft Active Directory & AD Lightweight Directory Service
- MacOS X Open Directory
LDAP and Ad Hoc Interface
Disabling HTTPS for either the appliance or Classroom Capture Ad Hoc interface passes LDAP credentials in clear text.
Network Requirements
LDAP communications use port 389 for insecure transport and port 636 for secure transport over SSL/TLS.
Enable LDAP Authentication
Enabling LDAP authentication consists of these phases.
- Consult With the LDAP Administrator
- Create the security module
- Test the security module
- Deploy the security module
- If you are deploying an application security module: Modify the user account
- Optional: Deploy additional security
Consult With the LDAP Administrator
Create the Security Module
- Log in as an Administrator.
- Navigate to the System > Security page of the ESS.
Click the Add button. The Add Security Module page appears, the top section of which is shown in the below figure.
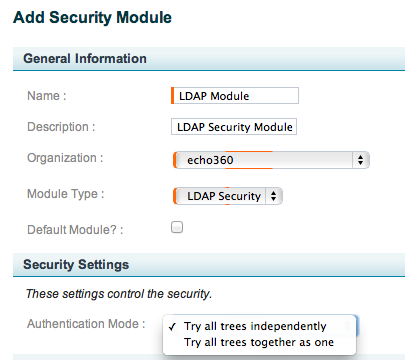
Enter a Name for the security module, preferably one that indicates its function, such as "LDAP_Content". This name appears in the Security Modules list and the Security Settings drop-down list for Organizations and Sections.
Enter a Description for the security module. This description appears in the Security Modules list.
Select the Organization to which this security module applies.
Select LDAP Security from from the Module Type drop-down list.
Use the Default Module checkbox to indicate whether this is the default security module inherited by all new sections. There can be only one Default security module.
For Authentication Mode, select one of the following options from the drop-down list, shown in the above figure:
- Try all trees independently: Select this option if you are using only one Tree for your LDAP authentication, or you are using a Master and Slave LDAP configuration, where the Tree configurations are identical and the Slave LDAP should only be used if the Master LDAP is unavailable or cannot authenticate the user for some reason.
- Try all trees together as one: Select this option if your Tree configurations are using different identifiers for authentication. For example, different types of users may use different User Name identifiers for login. Configuring multiple Trees to accommodate these different user identification types allows for seamless authentication of the different user types through a single security module.
- Complete the fields in the Tree 1 section, as well as the Tree 2 and Tree 3 sections if appropriate. See Consult with the LDAP Administrator section above for obtaining input for these fields.
- If appropriate at this time, enter a User Name and Password to test the LDAP configuration. See Test the Security Module below for more information.
When finished, click Save.
Test the Security Module
Each security module contains a section to test your configuration based on a specific user's credentials. Follow these steps.
- In the ESS, navigate to System > Security.
- Click on the label of the module you would like to test.
- Repeat the following steps for each user to be tested:
- Enter a user name in the User Name field.
- Enter that user's password in the Password field.
- Click Test LDAP Configuration.
- Look for a success message.
Deploy the Security Module
After you create and test a security module, deploy it.
- When deployed as a content security module, a student must log in against the LDAP criteria before viewing a presentation (an Echo).
- When deployed as an application security module, users must log in against the LDAP criteria before accessing the ESS administration interface (the web user interface).
Content and application security modules are deployed differently because they affect different parts of the system.
If You Use EchoCenter Pages
If you use EchoCenter pages and subscribe to the Collaboration Service you can enable different EchoCenter pages for students and Instructors. Users with the role of student see a student page; users with the roles of Instructor, Administrator, or Teaching Assistant see the Instructor EchoCenter page.
To allow for these different pages, LDAP must authenticate a user as either a student or Instructor. You must:
- Configure both a content security module and an application security module with at least one common LDAP authentication tree
- Deploy both the content security module and the application security module
If you do not deploy both security modules, everyone sees the standard EchoCenter page.
Deploy a Content Security Module
Follow these steps.
- Log in as an Administrator.
- Navigate to the Schedule > Courses page.
- Click on the name of a course containing a section where the content security module should be deployed.
- Point to the section.
- Click the edit button that appears.
- In the Application Security section, select the content security module from the Security Module drop-down list.
- Notice that additional fields appear with names similar to those on the module configuration page.
- Complete these optional section-level overrides to allow or disallow access based on the section an Echo belongs to.
- Save the section.
Deploy an Application Security Module
When you deploy an application security module, you can enable fallback to the ESS database and also allow ESS users to log in to view content.
Follow these steps.
- Log in as an Administrator.
- Navigate to System > System Settings.
- In the Application Security section, select the application security module from the Security Module drop-down list.
- Optionally, select Enable Fallback to Internal ESS Database and Allow ESS users to login to view content. See Application Security.
- Click Save.
Modify the User Account
If you are deploying an application security module, change the ESS user name so it matches the user name for other university accounts. This is often <initial><lastname>, though it could be the full email address. The ESS and LDAP servers use this key field to unambiguously relate an account in the ESS directory to an account in the (unrelated) LDAP directory.
If you are modifying the user name of the System Administrator, you must include a password. See Add a User .
Deploy Additional Security
If you and the LDAP Administrator decided that certain sections should have additional security (see Consult With the LDAP Administrator), add the security now.
Follow these steps for each section that requires additional security.
- Navigate to the section details page.
- Navigate to Schedule > Courses.
- Click on the link for the course you want to edit.
- Click on the link for the section you want to edit.
- On the section details page, find the Security Settings - Tree 1 settings group.
- Populate the following fields as instructed by the LDAP Administrator:
- Required Extra User Attribute Value
- Extra User Attribute Name