Configure Recording Devices for Personal Capture for Mac
In this section:
What Does It Mean to "Configure Devices"?
Before you start a capture, you need to select which devices you will record. By "configure devices" we mean that process of selecting the devices to record. You could set this up once and use just those devices forever. But you can also use different devices and different configurations for different captures. You can capture:
- Audio only (A)
- Audio and screen display (A/D)
- Audio and video (A/V)
- Audio and screen display and video (A/D/V)
- Audio and video and video (A/V/V)
You use the Audio/Video Devices dialog box to select the devices. The devices you select will be available for you to enable or disable when you begin recording. Say, for example, that you configured the Built-in microphone, Screen 1, and the Built-in iSight web camera. When you are about to begin a recording, each of these devices would be shown at the bottom of the pre-capture page.
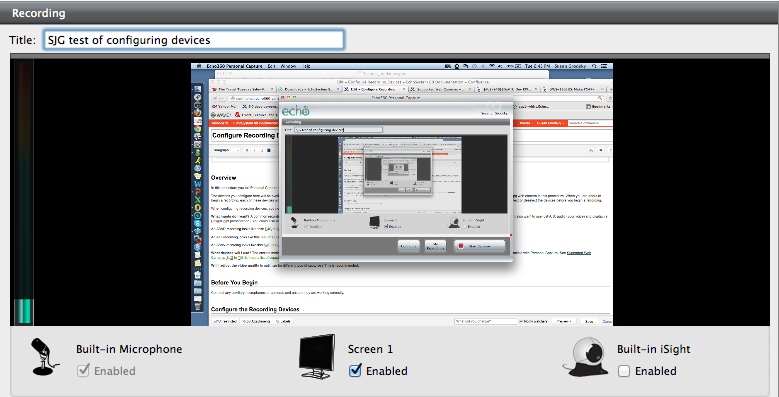
You can enable or disable them from the recording screen. (The Built-in iSight camera is disabled in the screen shown.) However, if you do not configure the devices in this procedure, you will not see them listed on the recording screen. You cannot enable or disable them at all.
How Do I Know What Devices to Configure?
In many cases, the devices you select will be fairly simple. Consider these questions when choosing the devices to configure. You can always toggle these on or off before the capture begins if your preferences change.
What data do I want in the recording? Probably the most common configuration is A/V/D: the recording contains audio (your voice), video (your image), and display (a PowerPoint presentation or other screen display). This configuration gives you the ability to have a "talking head" with a slide presentation. It will be displayed within the EchoPlayer as a dual-channel capture.
However, you might just want a simplified A/D capture with only audio and display. This way, if you are camera shy, you can walk through your slide presentation and discuss it, but your image is not recorded.
If you are more adventuresome, you could record a full A/V/V capture that contains audio and two video channels. You might use this if you are conducting an interview with another person: one camera is focused on your face, the other on your interviewee. The recording shows both of you. You might also want to use one camera on your face and another camera on an object that you discuss. For example, if you are teaching a physiology course, you might point this second camera at your hands while you disassemble a model of a human organ.
What devices will I use? The easiest method is to select and use the system display, the built-in microphone and the built-in video camera (which are very common on laptop computers). You can also connect other microphones and/or cameras, so long as they are compatible with EchoSystem Personal Capture (also called EchoCapture Personal or PCAP). See Working With Cameras and Personal Capture.
Configure the Recording Devices
Follow these steps.
- From the Welcome Screen or My Recordings screen, click Start Recording. This takes you to the pre-capture page.
- In the bottom panel, click Configure.

- The Audio/Video Devices page appears. Review the selections within the dialog box and correct any field as necessary.
- The Device drop-down lists show the devices that are plugged in and registered with the operating system.
- If your device is not listed, exit Personal Capture, plug in your device and restart Personal Capture. Devices not detected by the operating system are not usable by Personal Capture.

- Under Audio, select the recording device from the drop-down list.
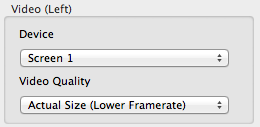
- Select the Video (Left) device you will use. You can choose either a capture of the computer screen display, or video input. If you use two visual inputs (either display and video or two video inputs), the data captured with the Video (Left) device appears on the left side of the finished recording. That is, it will be to the left of the data captured by the Video (Right) device.
- To capture your screen display (a PowerPoint presentation or other screen display) select Screen 1 from the Device drop-down list.
- To capture video, select the video input device from the Device drop-down list.
- Select the Video Quality for the Video (Left) input. For a Display input, remember that Actual Size (Lower Framerate) will create the best capture, but requires a large amount of storage and processing time. It also produces large playback files that are slow to load and challenge students' patience. Choose Smaller Size unless you have a strong need for the higher resolution.
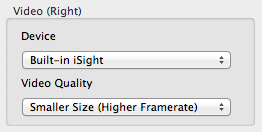
- Select the Video (Right) device you will use. The data captured will appear on the right side of the recording. That is, it will be to the right the data captured by the Video (Left) device.
- This device must capture video, using either the built-in camera or another camera you attach. To capture onscreen display items, use the Video (Left) selections noted above.
- The Video Quality drop-down list, shown in the Windows dialog box below, allows you to select Low, Standard or High resolution for the video capture. The higher the resolution, the larger the resulting file will be, and the more time it will take to upload to the server. Selecting Low or Standard resolution is sufficient in most cases. Select High resolution if there are details shown in the video capture that require the highest possible resolution.
- Click Save.
Now you have configured Personal Capture. You can always go back and re-select devices if you change inputs. These inputs appear on your pre-capture page. You can always toggle them on and off from the pre-capture page, changing the inputs for a particular capture.
Addressing Audio Issues
In certain circumstances, audio recorded on a Macintosh sounds unusually loud when the recording is played back within Personal Capture but is too low when students play the Echo.
This occurs because playback within Personal Capture artificially raises the audio volume. When you, the Instructor, hear this loud volume during playback, you may attempt to compensate by adjusting the Macintosh system preferences. The sequence of events is as follows.
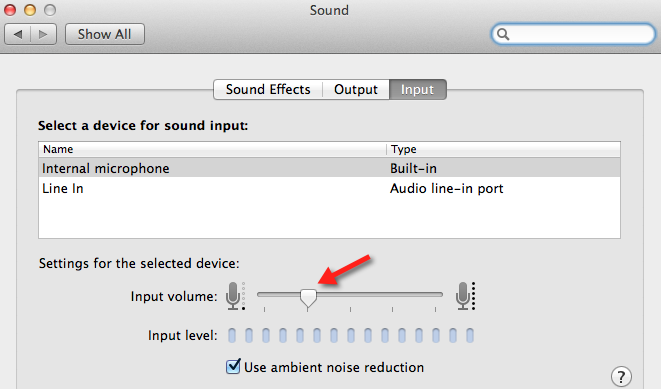
- You, the Instructor, lower the input volume setting on the Macintosh (System Preferences > Hardware > Sound). In the screenshot below, the Instructor has lowered input volume to 25 percent.
- You create the recording and play it back in Personal Capture. The audio volume is satisfactory.
- You publish the recording.
- Your students play the recording outside of Personal Capture and the volume is too low. Your students cannot hear what you are saying.
Best Practice: Keep Input Volume at 50 Percent or Higher
Resist the impulse to lower the input volume setting. Keep it at 50 percent or higher. In the screenshot below, input volume is 75 percent.
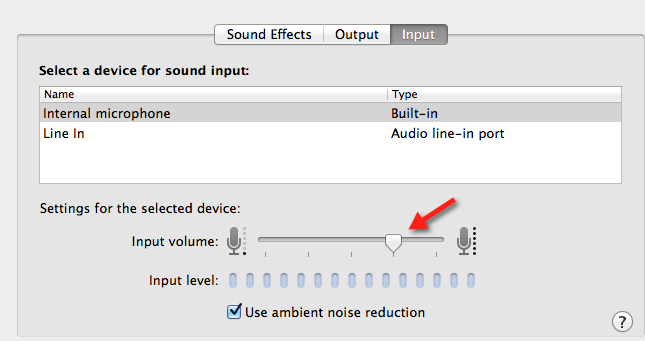
Your voice may sound very loud when you play the recording in Personal Capture, but the volume will be normal when students play the Echo. This practice applies regardless of the input device (internal microphone or line in).
If You Are Using Two Cameras
Capturing video with USB cameras has opened the door to many advancements in educational technology. Echo360 gives you the capability to use one or two ("dual") USB cameras in each capture. This opens up even more opportunity. However, USB cameras introduce computational and storage loads on personal computers and laptops. Even with the increased power of newer hardware, dual USB camera captures can strain the machines.
When you use two video cameras, please consider these issues:
- Insufficient processing power. The sheer amount of data captured by two cameras, especially if the cameras are capturing at high definition, can strain the processing power and internal bandwidth (data transfer) of your computer.
- Mis-synchronization. Differences in camera quality, initialization/startup time, and configuration can cause the two videos to be slightly mis-synchronized.
Follow the tips to minimize these issues.
Best Practice: Do Some Test Captures
Do some test captures first. This is a good idea for any model camera but especially important with newer, high definition cameras, which can strain the processing power of your computer. Make sure the capture proceeds well and the output is what you expect.
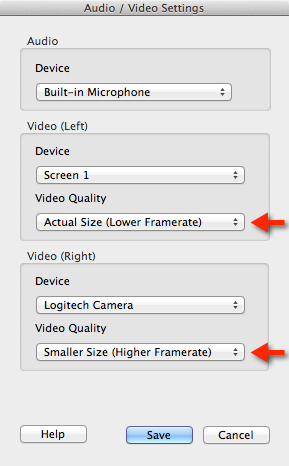
Addressing Synchronization Issues for AVV
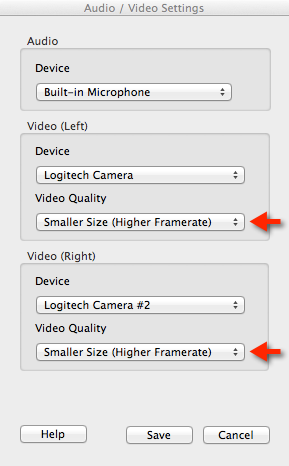
On Macintosh systems, we have found that adjusting the Video Quality settings to a Smaller Size for both channels (as shown below) alleviates synchronization issues in an A/V/V capture. On the Macintosh, the Smaller Size resolution is equivalent to TV/VCR quality and requires less processing power from your computer.
When recording A/D/V captures, mix Actual Size and Smaller Size. Choose the Actual Size (Lower Framerate) Video Quality for the camera capturing the display, and choose Smaller Size (Higher Framerate) for the camera capturing the video. This mixed configuration provides high-quality display while optimizing the size of the video capture.