...
You must logged be logged in as a System Administrator or the Administrator of the parent organization to use this feature. When you export or import objects, all objects of that type (all courses, all sections, all rooms) are exported. Export cannot be limited by the organization. That is why only System Administrators or parent organization Administrators (but not child organization Administrators) can use this feature.
...
- Follow these best practices to reduce the possibility of errors:
- Adjust the cell margins so you can easily see the content of each cell.
- Sort the spreadsheet so the relevant cells display at the top of the page.
- For add many operations: clear the existing data cells, but preserve row 1, the heading cells.
- Enter and edit data.
- If you change an object's organization, see Inheritance When You Change an Object's Organization.
- In the example shown below, David Goodwin, who had been Academic Staff for the university, becomes Academic Staff for the engineering school and a Scheduler for CLP. Gilda Good, who had been a Scheduler for the university, becomes a Scheduler for the engineering school.
- Save the edited spreadsheet as a CSV file.
...
- Navigate to Configuration > Users.
- Scroll to the bottom of the page.
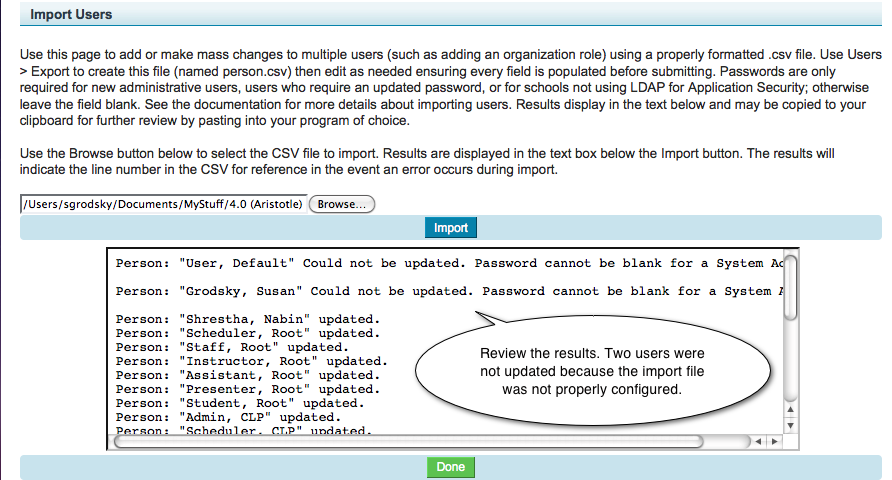
- Click Import. The Import Users screen appears.
- Review the help text. Make sure your import file is properly configured.
- Click Browse.
- Select the import file.
- Click Import. The file is imported and processed. Results of the import appear in the field at the bottom of the screen.
- Review the results.
- Notice in the example below that two users were not updated because the import file was not properly configured.
- Scroll to the bottom of the results field to review the summary. In the figure below, notice that the two users edited in the procedure above, David Goodwin, and Gilda Good, were updated.
- Decide if you need to edit the import file and re-import. You may want to copy the results to an editor (Notepad, TextEdit) or make notes about edits required.
- Click Done.
- If you like, check one or two user profiles to see the effect of the imports. The below example shows the user profiles for David Goodwin and Gilda Good.
Example - Move Courses to a New Organization
...
- Export the courses.
- Navigate to Schedule > Courses.
- Scroll to the bottom of the page.
- Click Export Courses.
- The course records are exported to a spreadsheet named course-<num>.csv, as shown in the example below. If you have a spreadsheet program installed, it opens automatically.
- Edit the spreadsheet. See General Procedure-Edit the Spreadsheet for details and best practices.
- You can change the course name, Identifier, and Organization.
- In the example shown below, Blended Learning is moved from Echo360, the parent organization, to the School of Arts and Sciences. The Identifier changes from ECH101 to EDU201.
- Import the edited spreadsheet, adapting the general procedure on importing.
...
- Export the rooms.
- Navigate to Configuration > Rooms.
- Scroll to the bottom of the page.
- Click Export.
- The room records are exported to a spreadsheet named room-<num>.csv. If you have a spreadsheet program installed, it opens automatically.
- Edit the spreadsheet. See General Procedure-Edit the Spreadsheet for details and best practices. The example below shows an edited spreadsheet ready to be imported.
- Import the edited spreadsheet, adapting the general procedure on importing.
...
You might, however, want to use export and import to post EchoCenter URLs to your LMS.You do not have to use this method if your LMS is Blackboard Learn or Moodle. You can configure either of these learning management systems so EchoCenter URLs post automatically. However, if you are using another LMS, you must copy the URL from the section details page, shown in the below figure, and paste it to the LMS course page.
This can be tedious if you have many URLs to post. You may prefer the method described here: exporting the URLs to a spreadsheet and then copy-pasting to the LMS course page from the spreadsheet.
...


