Manage Classroom Capture Sources
In this section:
Overview
Classroom Capture allows you to capture video input along with display and audio input. This capability is made possible by support for USB-connected input devices, including USB cameras and USB microphones. Integrated web cameras (if available on the podium PC) are also supported. Integrated webcams can be used because they are typically connected via USB, although internally. References in this documentation to "USB cameras" or "USB video sources" includes integrated webcams unless stated otherwise.
Classroom Capture automatically detects any connected sources and lists them in the Current Room Assignment section of the Edit Device page, shown in the figure below.
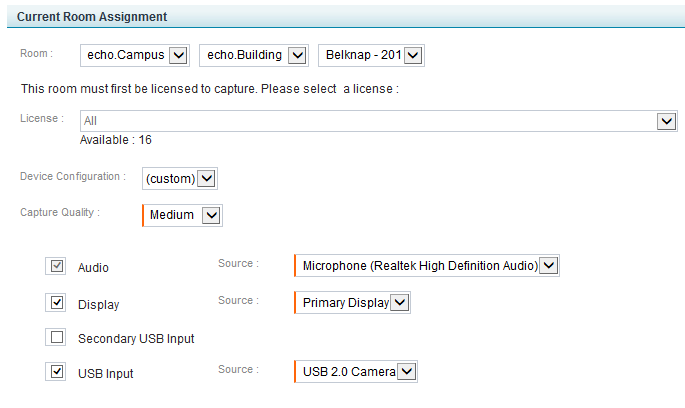
The Current Room Assignment section allows you to do the following:
- Assign the device to a room
- License the room for Classroom Capture
- Select the Capture Quality for the captures.
- Select or Deselect the input types you want to capture, then select the Source device for that input.
When you attach a USB camera to the podium PC, the system automatically detects the camera and selects it as the source for USB Input for video capture. The same is not true for USB microphones, however. You must manually select the external microphone as the Audio source unless it is configured as the Windows default audio device. You can also select the USB camera for Audio input if one is attached and it has a built-in microphone.
While the auto-detect feature will recognize and select an attached USB camera for video input, you are strongly encouraged to review the Current Room Assignment settings, shown in the next section, to ensure they are correct.
Classroom Capture supports the use of multiple USB devices, capturing:
Be sure also to refer to our list of Supported Cameras and Input Devices, specifically recommended devices for CCAP.
Configure Device Input for Captures - Current Room Assignment
Use the steps below to attach input devices, then review and edit the Current Room Assignment settings for each registered Classroom Capture device (installation).
- Where applicable, connect the USB source(s) to the Classroom Capture podium PC. To be sure you are using supported source devices, see supported USB-input devices.
- Review the camera settings in the camera's vendor-supplied software and adjust if necessary.
- The camera application and Classroom Capture both need to communicate with the camera driver and will sometimes "talk" to the driver at the same time. If the camera application is talking to the driver, Classroom Capture cannot and captures fail. See Install USB Cameras for Classroom Capture for details on how to avoid this contention issue.
- In the ESS, navigate to Configuration > Devices.
- You should see your Classroom Capture devices in the Active devices list, as shown in the figure below. If you do not, be sure you have registered the Classroom Capture software.

- In the Active devices list, hover over the device name and click edit. The Edit Devices page appears, including the Current Room Assignment section shown in the figure at the top of the page.
- In the Current Room Assignment settings, review and edit the selections as follows:
- Identify the Room (Campus, Building, and Room) where this Classroom Capture installation is located
- Use the License drop-down list to assign a Classroom Capture license to the room, if necessary.
- If necessary, select a Device Configuration from the drop-down list. You can probably leave this as the default (custom) setting.
- Select Capture Quality for the captures:
- Low - This creates a capture with low-resolution video and display. The lower resolution keeps the final file size to a minimum. This is a good choice if there are bandwidth issues that may cause larger file uploads or capture playback to fail.
- Medium - This is the default setting. It generates a capture with medium resolution video and display. This setting creates medium sized files for the recording. This setting is probably sufficient for playback on most devices.
- High - This setting creates high-definition resolution for video and display. Consequently, this setting also creates very large files for these captures. Use this setting if you have visual details in the display or video of the capture that requires students to see the recording in very high resolution. Otherwise, this setting should be used sparingly, due to the time required to upload and process the completed capture. In addition, this setting uses significant computer resources; if the podium PC cannot process a high-quality capture properly, your capture may be blank. If you DO need to use the High Quality setting, run a test capture first, to be sure it will work.
You may also want to refer to Configuring Quality Selection Settings - Advanced Users Only below.
- Select up to three inputs for the device to capture. As noted above, you can capture A/D, A/V, A/D/V or A/V/V inputs at any given time.
- Audio is selected by default. All captures will include audio. Select the appropriate Source for the audio input.
- Display is selected by default but can be unchecked if appropriate. If Display is to be captured, select the appropriate Source for the display input.
- Secondary USB Input allows you to select an additional device for input, such as a second video camera for A/V/V recordings. If Secondary USB Input is selected, also select the appropriate Source for input.
- USB Input is selected by default if there is a camera attached to the device (either external or internal webcam). If using the USB Input for capture, select the Source for this input.
- When finished with the Edit Device page, click Save.
Configuring Quality Selection Settings - Advanced Users Only
The resolution defaults for Classroom Capture outputs are maintained in a set of XML files installed with the program. If the resolution and other output details for the pre-configured selections are not appropriate for your situation and needs, you can manually configure these files. Changes in the XML files will change the output generated for captures made with the corresponding selection.
If you are not familiar with working in XML files, you are strongly encouraged towork with a local expert or contact Echo360 Customer Support for assistance. You must have Windows Administrator rights on the computer to alter these files.
The output quality XML files are located in the /config/ sub-folder of the Data directory identified during installation. By default this is: C:/ProgramData/Echo360/PersonalCapture/config
The directory contains the following files:
- HighRes.xml - This file controls the output resolution of the High Quality/Larger Files selection.
- MedRes.xml - This file controls the output resolution of the Medium Quality/Medium Files selection.
- LowRes.xml - This file controls the output resolution of the Low Quality/Smaller Files selection.
Each XML file contains property values that determine the capture output quality for Audio, Display, and Video inputs. If needed, you may change these files to generate different output settings for each of the selection options.
You must restart the Classroom Capture application for your changes to these files to take effect.
Create Copies of the Original XML Files Before Editing
We strongly recommend that you save a copy of the original XML files, as installed, PRIOR to making changes. In the event something happens where the altered files do not work or are not generating the desired output, you will want to have the original files for the program to use. You can simply create a copy in the same directory with "_ORIG" appended to the file name. For example, MedRes_ORIG.xml.
Remote Desktop Control
While Classroom Capture does allow for users to use the Remote Desktop Connection to connect to a Classroom Capture device, please note that this could affect the configured Classroom Capture sources. If a user logs into a Windows PC via the Remote Desktop Protocol (RDP), it's possible to overwrite the default Windows audio device. When that happens, the setting can stick with CCAP which could potentially cause future captures to fail. In order to avoid this please manually set your RDP client to NOT overwrite the remote PC's audio settings by specifying the settings shown below:

After Replacing, Removing, or Installing a New Input Device
Best Practice: Static Configurations
CCAP device support is designed specifically for static input configurations. Although an instructor can plug a capture device into the USB port and it will be detected, the use of the new device is not guaranteed. Inputs (both cameras and microphones) are required to be plugged into/connected to the PC in question prior to the start of a capture. For a scheduled capture, this means prior to the 5-minute "preroll" period and for an ad hoc capture, it means prior to pressing the Record button. An Administrator should review any new source configurations before the start of a capture session.
Follow these steps if you:
- Replaced an existing source device
- Installed a new or additional USB source device to the podium PC
- Removed an existing USB source in favor of using another already-connected USB source or an existing integrated input source, such as the integrated webcam for video or internal microphone for audio
After installing, replacing, or removing an input device:
- Connect the new input source device to the USB port of the podium PC. If you are removing a source device, skip to step 3.
- Review the camera settings in the camera vendor-supplied software, and adjust as appropriate. Also refer to Install USB Cameras for Classroom Capture for configuration instructions to avoid contention for the camera driver between Classroom Capture and the camera application.
- In the ESS, navigate to Configuration > Devices.
- In the Active devices list, hover over the Classroom Capture installation that has the new or removed USB source and click edit.
- In the Current Room Assignment section of the page, review and change the input options and Source selections as needed.
- Click Save.
Accidental Device Removal
If a device becomes disconnected from the classroom PC, the room configuration will not automatically change to use remaining available devices. Rather the room configuration options will reflect these changes, and user/administrator input is needed to resolve this new state, and reconfigure the room to use any remaining devices.
If a scheduled capture is configured to be recorded and an input becomes disconnected the system will do the following:
- If either a video, display or audio device is missing or disconnected, a balloon notification will appear on the classroom PC, informing the instructor that the device is not being detected. If plugged in during the 5-minute "preroll" prior to a scheduled capture, that input will begin being recorded. If plugged in after the scheduled start time or exactly at the start time, that input will not be captured.
- For video or display inputs that were removed during the "preroll" time, the capture will still occur but those portions of the capture will be missing. In the case that video or display removal happened after the capture started, that capture will stop. Audio is always required for capture.
- For missing audio input, a balloon notification appears on the classroom PC to inform the instructor. If the instructor reconnects the exact same audio input that the room was configured for when the capture was scheduled, the capture will begin at that time. Plugging in any other (different) audio device will not automatically start the capture. Also, if no audio is detected, the capture will not occur.