Manage Product Groups
In this section:
Overview
Product groups simplify scheduling because they are ready-made "bundles" of products and output qualities. Product groups simplify the scheduling process because they allow a Scheduler to choose a ready-made product group instead of specifying individual products. You can make the process even easier for the Scheduler by giving a product group a "friendly name" that suggests its function:
- "Use for math classes"
- "Use for special events in Everest Hall"
- "Use for med school procedure demonstrations"
You may have up to three different types of product groups:
- Default product groups. After you install or upgrade to EchoSystem 4.0 or higher, you will see the default product groups.
- System-generated product groups. If you upgrade to EchoSystem 4.0 or higher from an earlier release, you may have additional product groups. These have the term "Upgraded product group" in their names. During the upgrade process, the EchoSystem Server (ESS) analyzes your existing schedules and prepares additional product groups that support the products you have requested most often.
- Custom product groups. You, as the System Administrator or Organization Administrator, may decide to create custom product groups.
A product group owned by the parent organization is automatically shared with all child organizations. A product group owned by a child organization cannot be shared with other child organizations.
About Default Product Groups
Default product groups are included with a new or upgraded installation.
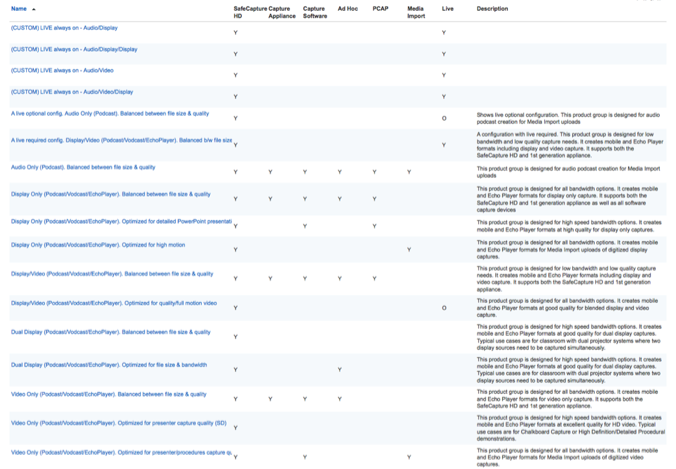
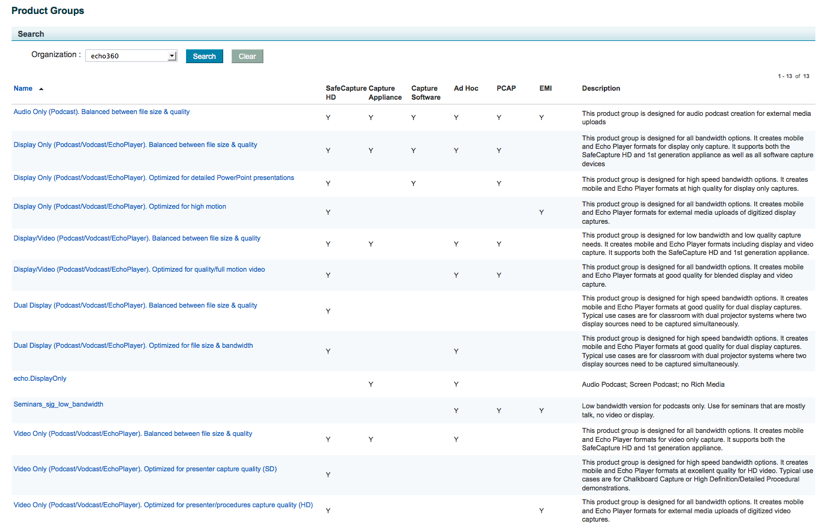
- The Product Groups page, shown in the below figure, identifies capture appliances and applications supported by a particular product group.
- The Live column indicates whether a product group supports live webcasting. A Y indicates that the product group always supports live webcasting. An O indicates that live webcasting is optionally provisioned for the product group. See Add a Custom Product Group for details.
The descriptions discuss products supported, bandwidth, quality, and typical use cases.
Assign a Product Group to a Section or Schedule
When you add or edit a section or schedule, you assign a product group. When you do this:
- Review the product group details.
- Understand that the product groups available for selection are determined by what device is in the venue. For example:
- If the venue has an EchoSystem Capture Appliance, you will not be able to select a product group with "highest quality video" because this is not supported by the device.
- If you are configuring a section for live webcasting, the room must contain an EchoSystem SafeCapture HD device. If it does not, you cannot select either a "live only" product group, nor can you enable the Stream Live check box.
If you would like users to be able to access and view Captures on their Android mobile devices, you must select "Screen Podcast" as the Vodcast product (rather than "Video Podcast").
Add a Custom Product Group
Keeping custom product groups to a minimum makes it easier to manage your EchoSystem. Before creating a custom product group, review the existing product groups to see if one is sufficient. Consider:
- The content (audio, video, display) you want to capture
- The quality (high, medium, low) you want to capture
- The products you want to support
- The devices that support those products
If you determine that a custom product group is needed, you can add a new group or copy and edit an existing group.
- Navigate to Configuration > Product Groups. The Product Groups page appears.
- Click Add. The Add New Product Group page appears.
- Complete the Product Group Information section.
- Enter a name for the new product group. You might want to specify a "friendly name" ("Use for math classes") that will help a Scheduler choose the product group for particular sections or schedules.
- Optionally, enter a description. You might want to include details that will help a Scheduler choose the product group for particular sections or schedules ("Use for classes in Room 767").
- Select the parent or child organization to which this product group belongs.
- Review the Estimated Storage information.
- In the Product Details section, select the Podcast, Vodcast, and EchoPlayer options from the drop-down lists.
- Select the quality for each output option.
Review the suggested use cases and storage/bandwidth estimates for the output option and quality you selected. For on-demand profiles, the numbers are storage estimates. For live profiles, the numbers are estimates of bandwidth consumption.
Best Practice: Compare These Estimates to Your Own Experience
The storage/bandwidth estimates shown are derived from a test environment. We recommend that you compare these estimates with your own experience. See the discussion on bandwidth requirements for details on estimating bandwidth for live webcasting.
- If you want to enable live webcasting for this product group, do the following:
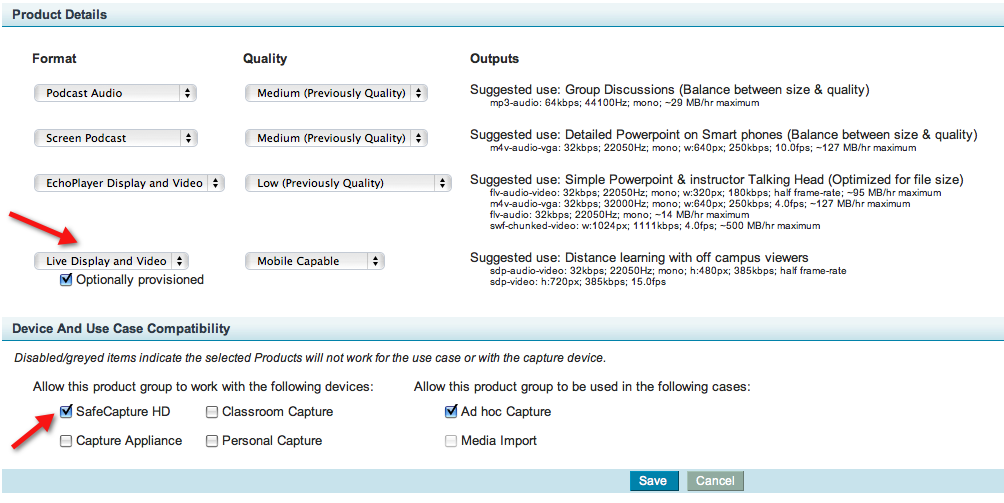
- In the Format section, select a live format option from the drop-down list. "Live Display and Video" is selected in the example below.
- Select the quality for the live webcasting option. "Mobile Capable" is selected in the example below.
- Review the suggested use cases for the output option and quality.
- In the Device And Use Case Compatibility section, select the SafeCapture HD device by checking the box. Other devices can also be checked, however, live webcasting is only supported using a SafeCapture HD device.
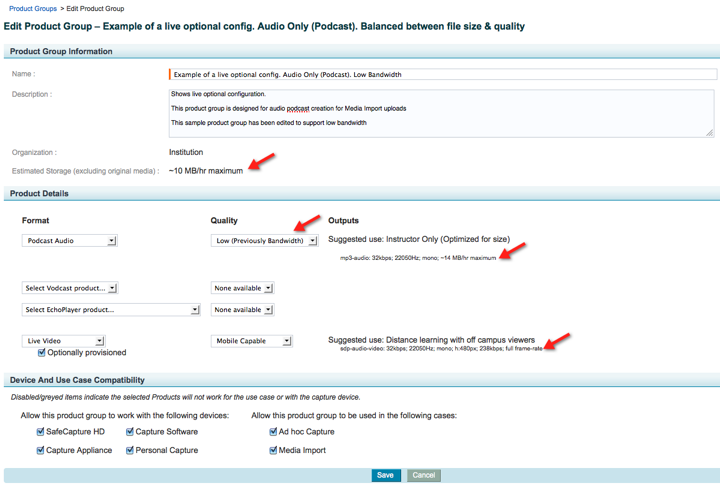
The example below shows the sections of the Edit Product Group page that contain these settings.
- In the Format section, select a live format option from the drop-down list. "Live Display and Video" is selected in the example below.
- If you enabled live webcasting, check or uncheck the Optionally provisioned check box, shown in the figure below. This allows you to control live webcasting for an individual section that uses this product group.
- If this box is checked, you can enable or disable live webcasting when you configure the section schedule.
- If this box is not checked, all schedules that use this product group will automatically generate a live webcast.
- If you have not already, complete the Device And Use Case Compatibility section.
- Click Save.
View Product Group Details
- Navigate to Configuration > Product Groups.
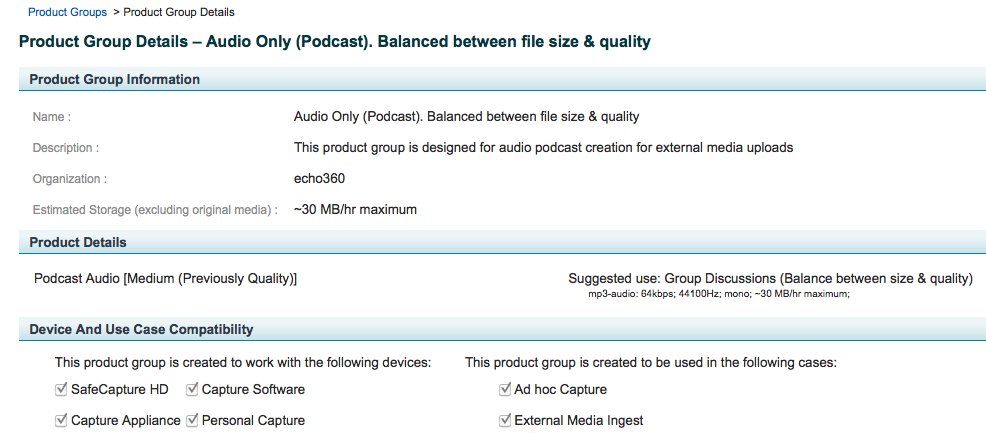
- Select a product group by clicking it. The Product Group Details page appears as shown in the figure below.
Edit a Product Group
You can edit any field except Organization.
- Navigate to Configuration > Product Groups.
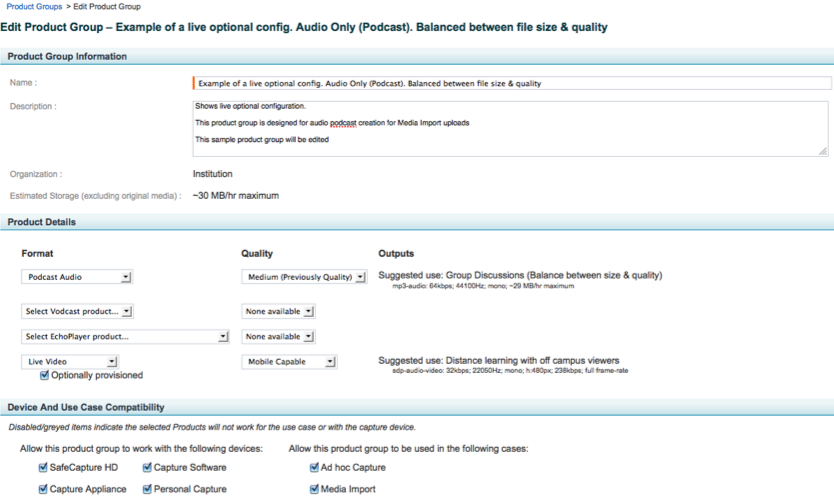
- Hover over the product group that you want to edit and click edit. The Edit Product Group page appears as shown in the figure below.
- Edit the product group fields. You can edit any field except Organization. In this example, we edit the product group to create a low bandwidth version. Notice that the storage/bandwidth estimates have changed as shown in the figure below.
- Click Save. The Product Group Details page appears.
- Click Done to return to the Product Groups page. You can also begin to add, copy, or edit a product group by clicking the relevant button at the bottom of the page.
Copy a Product Group
You might want to create a custom product group by copying an existing product group and editing a few fields.
- Navigate to Configuration > Product Groups.
- Hover over the product group you want to edit and click copy. The Add New Product Group page appears.
- Edit the product group's name, description, or products.
- Click Save. The Product Group Details page appears.
- Click Done to return to the Product Groups page. You can also begin to add, copy, or edit a product group by clicking the relevant button at the bottom of the page.
Filter the List of Product Groups
- Navigate to Configuration > Product Groups.
- At the top of the page, select the organization whose product groups you want to be included in the filtered list.
- Click Search. Only those product groups matching the filter you selected appear. The example shown in the figure below shows product groups belonging to the Echo360 organization.
- To see the unfiltered list, click Clear.
Delete a Product Group
You can delete any product group.
- Navigate to Configuration > Product Groups.
- Hover over the product group you want to delete and click delete. A confirmation message appears.
- Click Yes. The Product Groups page appears with a delete confirmation message at the top.
