EchoSystem Server Basics
- Hannah Petty
In this section:
Access the User Interface
The EchoSystem Server user interface (ESS UI) is a secured web-based interface accessible from any standard web browser. The EchoSystem administrator configures the web interface address after installation.
The default address for the UI is:
https://ess.institution.edu:8443
where ess.institution.edu is the host name of the EchoSystem Server (ESS).
The ESS UI requires authentication. The default user name for the UI is ess@echo360.com and the default password is password. See Change the Admin Password for instructions on changing this password.
Server UI Navigation
The ESS UI uses a tab and subtab approach to navigation. At the top of the interface there are several tabs. During some operations you may also see a breadcrumb, identified in the figure below, which simplifies navigation to screens beyond a subtab. There are three other navigational items displayed at all times: Help, Logout and Username (i.e., ess@echo360.com). The Help link takes you to this documentation. The Logout link ends your UI session. The Username link takes you to the change password screen, as identified in the figure below. The image below shows each of these navigation items.

Page Types
The UI provides the ability to both view and edit properties for certain items. These pages are referred to as show pages and edit pages. Show pages provide a listing of the properties for an item. Edit pages allow the user to set or modify properties and then save them. For example, the show page for a Blackboard publisher displays the information entered for the publisher, while the edit page allows you to edit that information.
Show Page Example
The following figure is an example of a Show page.

Edit Page Example
The following figure is an example of an Edit page.

Download Installers
Installers for the EchoSystem components listed below can be downloaded from the Echo360 website:
- Classroom Capture
- Personal Capture
- Processor (media processor)
Follow these steps.
- Navigate to Downloads > Downloads.
- Click on the link for the installer you need.
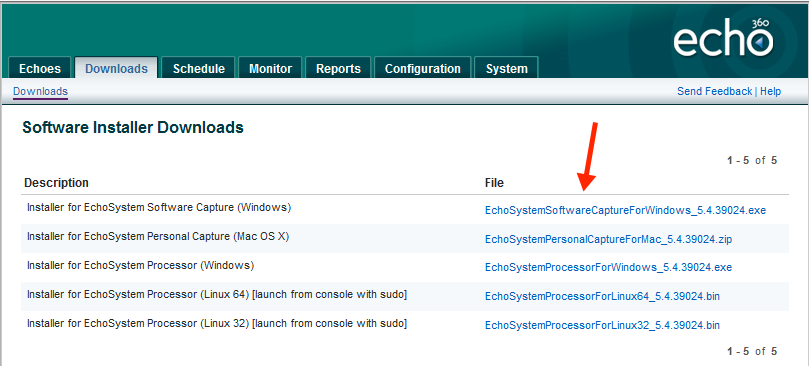
- Installer instructions differ by component. Follow the on-screen instructions.
Start or Stop the ESS
The ESS runs as a service or daemon. Managing this service is specific to the platform. Starting, stopping and restarting this service is referred to throughout this document. The ESS UI also indicates when service restarts are required.
Wait Five Minutes
After restarting the ESS, wait five minutes before connecting. This ensures that the ESS is fully started.
Start ESS on Windows
- From the Windows taskbar select Start > Programs > Administrative Tools > Services. The Services dialog opens.
- Select the EchoSystem Server service.
- Click Start. The ESS service starts on your local computer.
Stop ESS on Windows
- From the Windows taskbar select Start > Programs > Administrative Tools > Services. The Services dialog opens.
- Select the EchoSystem Server service.
- Click Stop. The ESS service stops on your local computer.
Restart ESS on Windows
- From the Windows taskbar select Start > Programs > Administrative Tools > Services. The Services dialog opens.
- Select the EchoSystem Server service.
- Click Restart. The ESS service restarts on your local computer.
Start ESS on Linux
- Open a terminal prompt.
Type in the start command. The command is:
sudo /etc/init.d/echosystemserverd.sh start
Notice the Space
Note that there is a space between the file name and the start command.
Status messages show you when the service starts.
Stop ESS on Linux
- Open a terminal prompt.
Type the stop command. The command is:
sudo /etc/init.d/echosystemserverd.sh stop
Notice the Space
Note that there is a space between the file name and the stop command.
Status messages show when the service stops.
Restart ESS on Linux
- Open a terminal prompt.
Type in the restart command. The command is:
sudo /etc/init.d/echosystemserverd.sh restart
Notice the Space
Note that there is a space between the file name and the restart command.
Status messages show when the service stops and then starts.
Start or Stop Wowza
The Wowza Media Server (Wowza) runs as a service or daemon. Managing this service is specific to the platform. Starting, stopping and restarting this service is referred to throughout this document. The ESS UI also indicates when service restarts are required.
Start Wowza on Windows
- From the Windows taskbar select Start > Programs > Administrative Tools > Services. The Services dialog opens.
- Select the Wowza Media Server service.
- Click Start. The Wowza service starts on your local computer.
Stop Wowza on Windows
- From the Windows taskbar, select Start > Programs > Administrative Tools > Services. The Services dialog opens.
- Select the Wowza Media Server service.
- Click Stop. The Wowza service stops on your local computer.
Restart Wowza on Windows
- From the Windows taskbar, select Start > Programs > Administrative Tools > Services. The Services dialog opens.
- Select the Wowza Media Server service.
- Click Restart. The Wowza service restarts on your local computer.
Start Wowza on Linux
- Open a terminal prompt.
From the terminal prompt, type in the start command. The command is:
sudo /etc/init.d/WowzaMediaServer start
Status messages show when the service starts.
Stop Wowza on Linux
- Open a terminal prompt.
From the terminal prompt, type in the stop command. The command is:
sudo /etc/init.d/WowzaMediaServer stop
Status messages show when the service stops.
Restart Wowza on Linux
- Open a terminal prompt.
From the terminal prompt, type in the restart command. The command is:
sudo /etc/init.d/WowzaMediaServer restart
Status messages show when the service stops and then starts.