Live Webcasting for Academic Staff
- Hannah Petty
In this section:
What is Live Webcasting?
Live webcasting supports blended distance learning. This means that you teach some students ("classroom students") in a traditional classroom environment and other students ("remote students") are outside of the classroom, either all of the time or some of the time:
- The classroom students listen and participate as usual.
- The remote students are each logged in on their own computers, watching the presentation as it occurs. In many cases, these remote students can participate in classroom discussions via the chat application.
- The presentation is also captured and all students can view it later as an Echo. The entire chat log is attached to the Echo. This means that classroom students (who cannot see the chat log during the lecture) can view the chat log when they view the Echo.
Live webcasting makes very little difference to you as a Presenter. You will still:
- Give your lecture
- Answer student questions or lead discussions
- Attach your laptop to the classroom projection devices
- Use the document camera or other in-classroom devices
However, you also have these new capabilities:
You can control the capture of the live webcast. You can pause and resume the live webcast to allow for class breaks, and even extend the time allowed for the webcast if necessary. You can also stop the webcast if the class or event has finished before the scheduled end time.
- You can monitor the webcast. You can monitor the student view of your presentation. This allows you to adjust items as needed during the webcast.
- You can include Lecture Tools polls and quizzes with your presentation if your institution uses and has integrated Lecture Tools with EchoSystem.
High-Level Procedure
Although webcasting does not differ much from the typical lecture, it does require some additional preparation. We suggest this procedure. Some tasks can be delegated to a Teaching Assistant (TA):
- Appoint a TA or student to manage chat for you. Delegating this task allows you to concentrate on lecture and discussion. See Manage Chat.
- Access the Webcast Presenter View to start the webcast.
- Monitor the webcast. Verify that remote students can see all parts of the presentation.
- View Attendees of the Webcast. This shows you how many students are attending the class.
- Begin the lecture.
- Pause and resume the recording as needed.
- At the end of the lecture, remind students that the recording, which includes the entire chat log, will be available as part of the Echo. Classroom students do not see the chat log during the lecture.
- Log out of the EchoCenter.
Access the Webcast Presenter View
The Presenter view of a live webcast is different from the student view:
- Like the student view, the Presenter view contains an Apps pane. However, the Presenter apps are different from the student apps.
- Chat (if available) resides on the main pane of the window. This is shown in the figure below of the default Presenter view.
- The Monitoring app, when enabled, expands in the Apps pane. See Monitor the Webcast for a picture of the Presenter view with the Monitoring app selected.
When the System Administrator configures the section, she can assign multiple Academic Staff roles to the section, such as an Instructor and one or more Teaching Assistants (TA). This allows TAs to use their own logins to access the Presenter view and assist the instructor. The Presenter view of the webcast is available to any Academic Staff configured for the section, regardless of role.
Presenter View Only Accessible Through EchoCenter
In order to see the Presenter View, you must be authenticated as Academic Staff for the section by logging in to the EchoCenter for the section. If you access the webcast using a direct link or through the Monitoring tab of the ESS, you will only see the Student (or Player) view of the webcast and you will not have access to the Presenter tools for the webcast.
To access the Presenter view:
- Go to the classroom assigned for the class
- Log in to the EchoCenter page for your class.
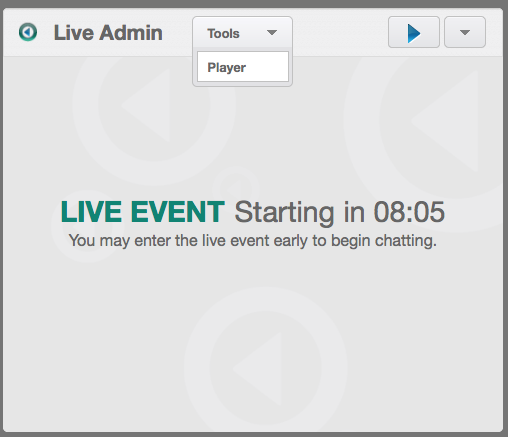
- Click on the join button on the EchoCenter page, shown in the figure below.

- In the Live Admin section of the window that appears, be sure Tools is selected as the view type. If you choose "Player" instead, as shown in the below figure, you will see the student's view of the presentation and will not have access to all of the tools available for Presenters.
- Choose the theme (Light or Dark).
- Click the Play button to launch the EchoPlayer.
- Verify that you are seeing the Presenter view of the live webcast. You should see Monitoring and Capture Control buttons, along with the other Apps listed on the right side of the screen.
- If you are not seeing the Monitoring and Capture Control buttons on your screen, you are not configured as or are not logged in as a Presenter for this section. You may need to close your browser and re-access the EchoCenter to log in with the appropriate credentials.
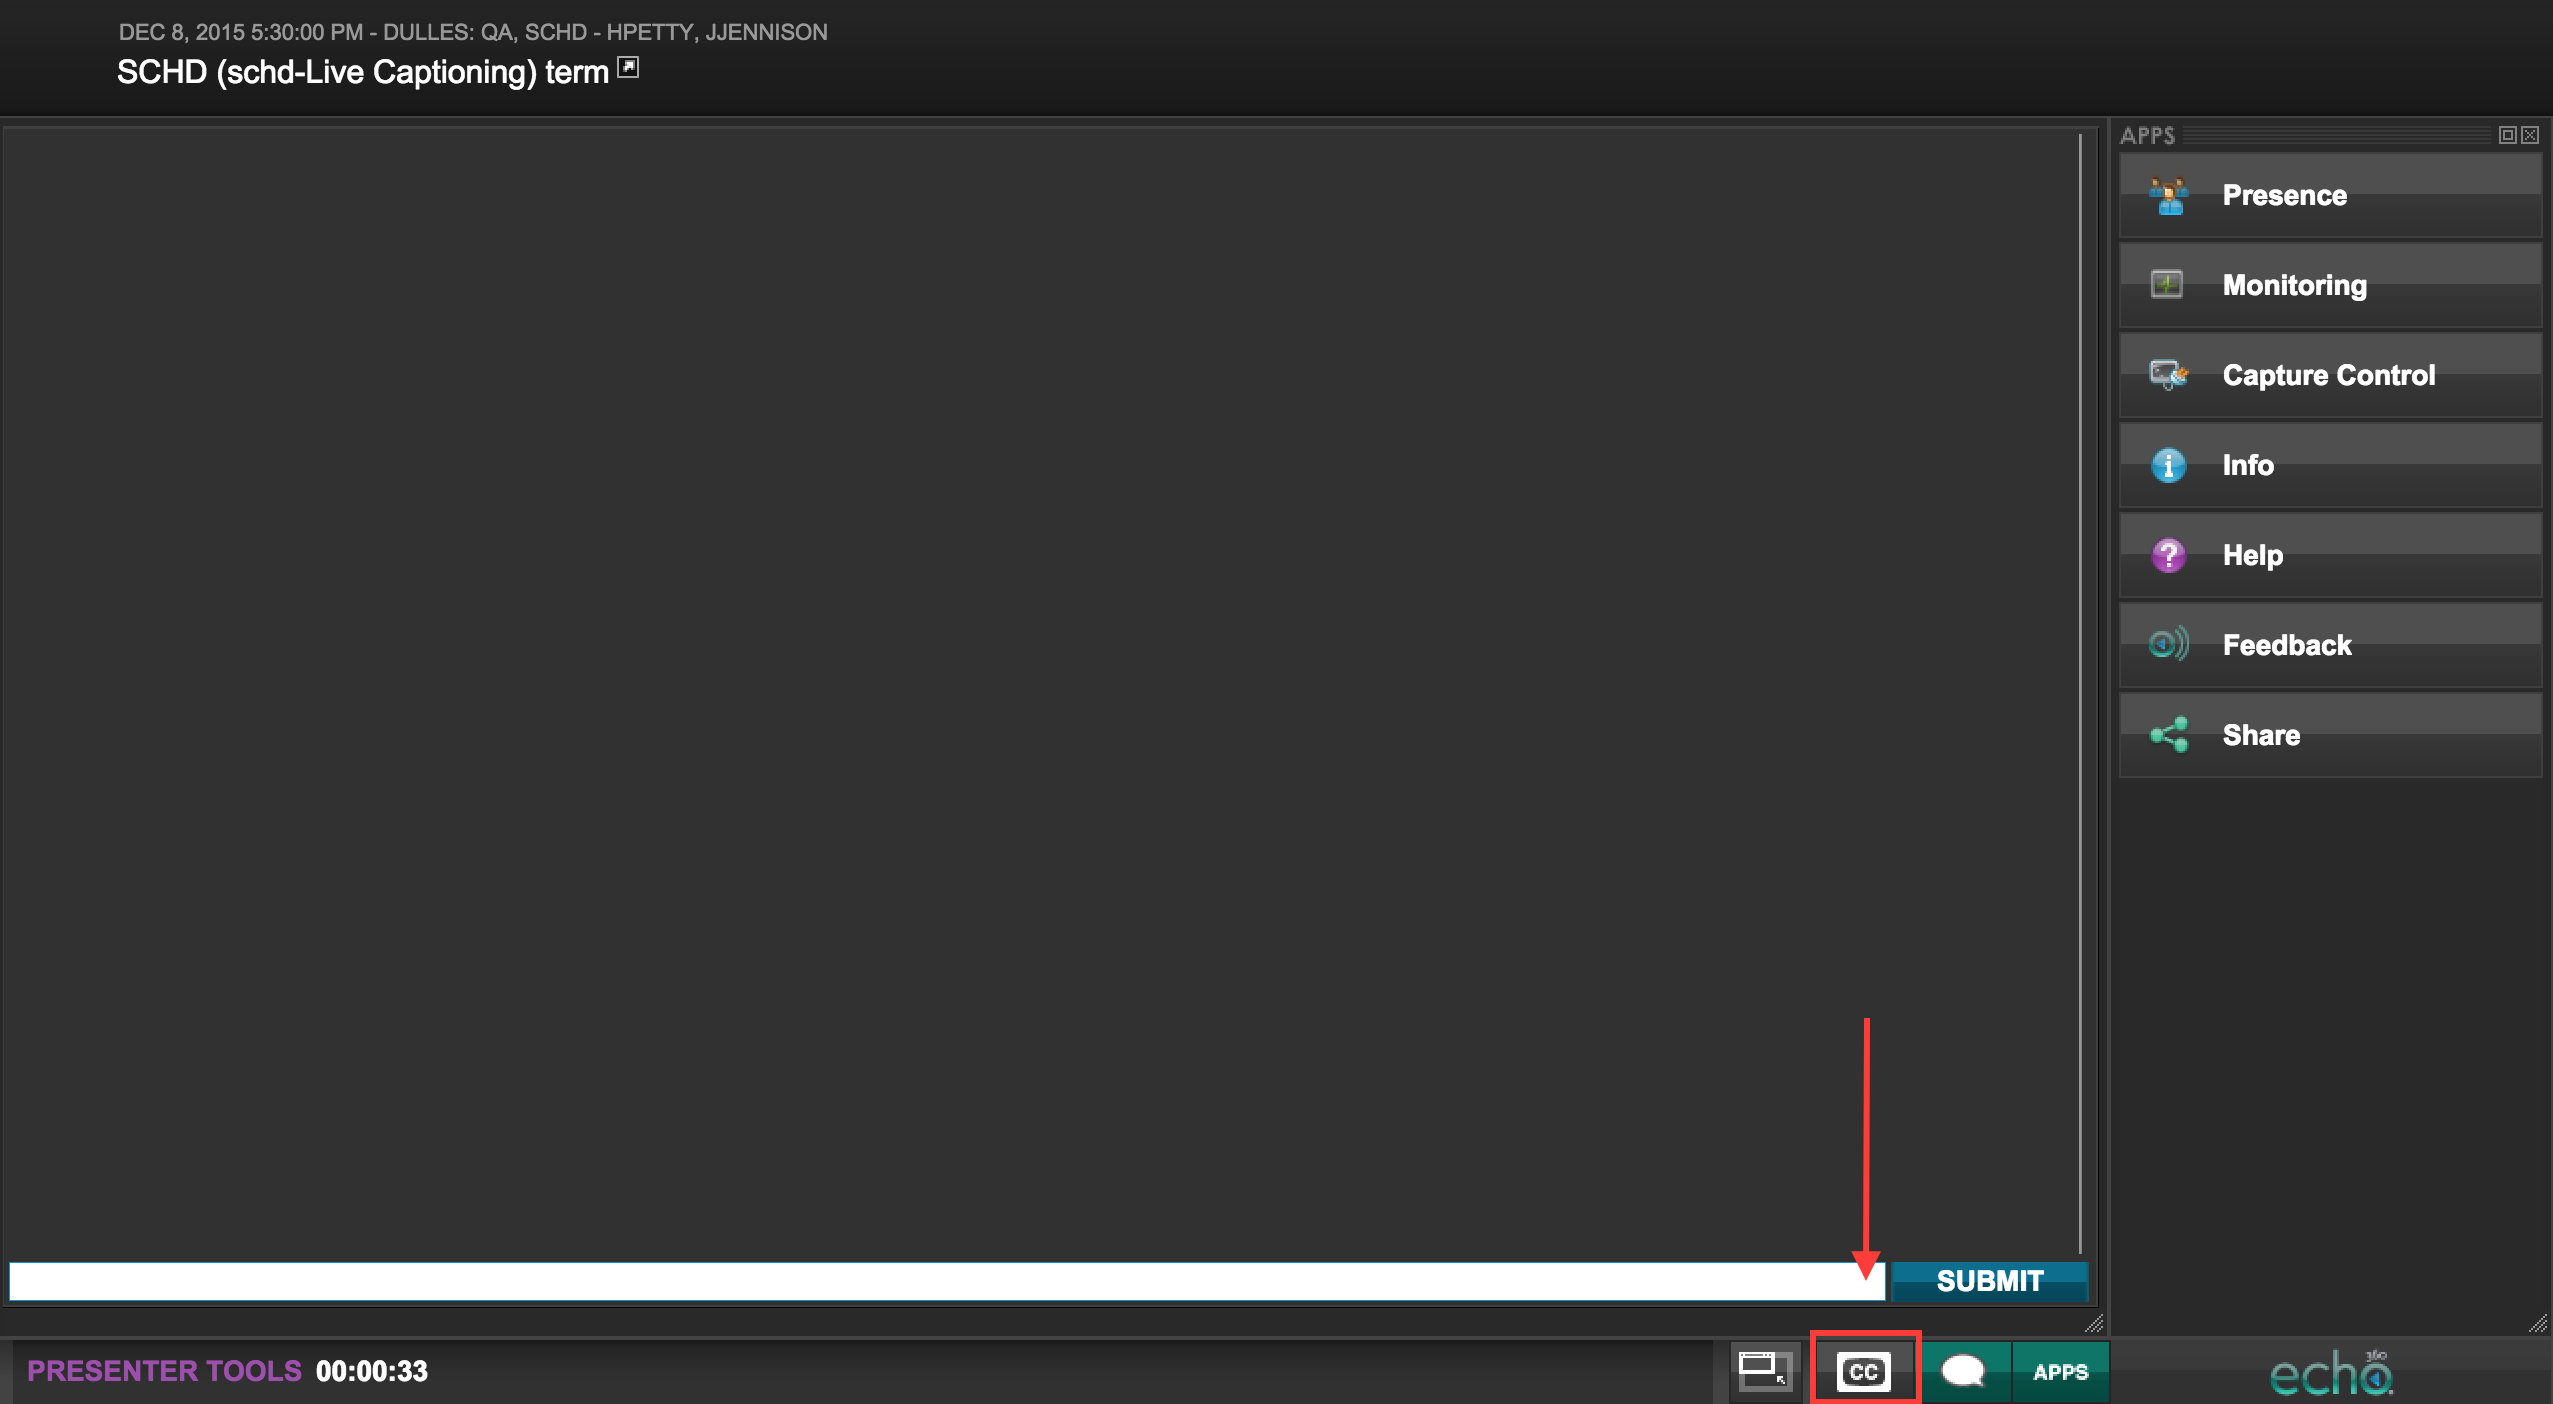
The figure below shows the default Presenter view of a live webcast, including chat entries in the main portion of the window and Presenter apps on the right.

The Apps buttons shown may include some or all of the following, depending on which applications the System Administrator has chosen to enable and whether your system uses collaboration features:
- Presence, Monitoring, Capture Control: Appear only for live webcasts and are described in the sections below.
- Info, Help – Appear for both Echoes and live webcasts.
- Share, Feedback – May appear for both Echoes and live webcasts. System Administrators can hide or show these buttons.
At the bottom of the screen the Presenter Tools toolbar contains:
- A timer, showing how long you have been logged in to the webcast
- Buttons that allow you to show or hide the chat window or the Apps buttons
- A "screen reset" button that reverts the screen to the original configuration, showing both the chat window and the Apps buttons.
Manage Chat
You may want to ask a TA or student to monitor the chat log while you present your lecture. The Chat Monitor can summarize questions and comments from the chat session, presenting them to you for a response. Since all students can see the chat log, the Chat Monitor is not required to use the Presenter view. However, since the chat log in the Presenter view (shown above) comprises the majority of the screen, the monitor may find it easier to use the Presenter view than the Student view of the webcast.
Whoever is monitoring the chat log during the webcast must be logged in with an Academic Staff role in order to see the Presenter view of the chat log. Follow these steps:
- Ask the Chat Monitor to log into the webcast through the LMS or EchoCenter.
- If the Chat Monitor is a TA and is assigned to the section, s/he will see the Presenter view described in the section above.
- If the Chat Monitor prefers the Presenter view but lacks the credentials to access it, you can log in to the EchoCenter page (using the Instructor credentials) on the Chat Monitor's computer.
- As comments arrive, the Chat Monitor can:
- Read the comment or
- Save the comments and summarize them for you during the class question period
- Remind the Chat Monitor to log out at the end of class.
Chat entries are processed with the webcast and attached to the Echo. This means that anyone viewing the Echo can also review the chat.
When Remote Students Can See Chat Traffic But Cannot Enter Questions
In rare situations, some students will be able to enter questions (producing chat traffic), while others cannot. Why does this occur?
Only students who have logged in to the EchoSystem may enter questions to the chat application though all remote students can see the chat traffic.
If the section or event does not require students to log in, most students will not be able to enter questions. However, a few students may still be logged in because their credentials carried over from a previous EchoCenter or LMS session. These logged-in remote students will be able to enter questions, producing chat traffic. Other remote students, who are not logged in, will be able to see this traffic, but not enter questions themselves.
Although it is annoying to be prevented from participating during the class, students should contact the System Administrator to resolve the problem.
Monitor the Webcast
You or your TA may want to monitor the webcast to be sure that students are seeing everything you need them to see. Follow these steps:
- Log into the webcast as an Academic Staff member, to access the Presenter view.
- Click the Monitoring button located in the Apps list, shown in the following figure.

- The Apps list changes to a Media Monitor, showing the visual inputs being webcast, as demonstrated in the below figure. These inputs commonly include:
- A video feed, which may be a headshot of you or a shot of the entire classroom
- A display feed, showing your PowerPoint or other presentation from the classroom computer.

- You may leave the Media Monitor open for the duration of the class, or you can click the Applications button to return the Apps list.
Monitoring Through the ESS is Not Recommended
Monitoring Through a Mobile device is Not Recommended
Echo’s live webcasting feature is designed primarily for multimedia streaming to a PC or Mac via a broadband network connection. However, Echo360 supports the viewing of Live webcasts on iOS devices running iOS 5 and above. Ask your System Administrator if this has been configured at your Institution.
Keep in mind, however, that mobile viewing is subject to the following limitations:
- Viewers will only see the Primary Display (e.g., what is featured on a computer screen during the presentation) OR the Video for the event. They will not see both.
- Viewers may require a broadband (wifi) connection for the event to stream smoothly.
- Viewers will only have access to the Student (or Player) view.
View Attendees of the Webcast
You may want to see which students or how many students have logged into the webcast. Follow these steps:
- Log into the webcast as an Academic Staff member, to access the Presenter view.
- Click the Presence button located in the Apps list, shown in the following figure.
- The Apps list changes to show a list of who is logged into the webcast along with a tally of the total number of students online, as shown in the below figure. Notice that the Instructor for the webcast is identified with a special icon and the Instructor's user name is shown in bold. These identifiers also apply to the TA assigned to the section.

You can leave the presence list open for the duration of the class, or you can click the Applications button to return to the Apps list.
Why Is Nobody Watching?
Presence only shows logged in users. If the section or event does not require users to log in, you may see no entries in the presence list, or you may see only a few users, those whose login carried over from a previous EchoCenter or LMS session.
If the presence list is always empty, ask your System Administrator if authentication is required for your section.
Control the Capture of the Live Webcast
You can control the live webcast of your class in the same way you would control an Ad Hoc recording of a class (see Classroom Capture for Academic Staff). You can also extend a webcast beyond its scheduled end time if necessary.
In most cases, your primary use of the capture control feature of a live webcast will be to pause and resume the webcast as needed, though you also have the option to start the webcast early or stop the webcast, or to extend the webcast beyond the scheduled time.
Pausing a webcast may be useful for short breaks in the class, or for taking time to set up a classroom activity that may not need to be captured or broadcast. However, the end time/duration of the scheduled class remains the same, so pausing for these is not necessary.
If you do decide to pause the webcast, keep in mind the following:
- While paused, anything that happens in the room is not broadcast to remote students and is not captured in the Echo.
- Remote students will see a dark screen with two vertical lines, resembling a Pause symbol. When the webcast is resumed, remote students will again see the broadcast activity from the venue.
- Since remote students will only see a pause symbol, as a courtesy you should:
- Explain that you are pausing the webcast and why. Use the chat feature, if available, to provide this information on the screen during the pause as well as verbally prior to pausing.
- State when the webcast will resume. Again, use the chat feature, if available, to provide this information on the screen during the pause.
- Ask remote students to keep their browsers open, remain logged in, and watch for the webcast to resume.
The pause/resume/extend functionality is accessed through the capture device's web interface, the same way Ad Hoc recordings are accessed and manipulated. Follow these steps:
- Access the Presenter view of the live event using an instructor login.
- From the Apps buttons located on the right side of the screen, click Capture Control, shown in the figure below.
- From the Capture Control panel, click Capture Device, shown in the figure below.

- A browser window appears, requesting a login. Log in as an Instructor. This opens the capture interface for the device, shown below.

- Use the Stop Capture, Pause Capture/Resume Capture, and Extend Capture buttons, described below, to manipulate the live webcast as needed.
- Stop Capture - Stop the capture immediately, regardless of time remaining in the schedule.
- Pause Capture - Temporarily suspends the broadcast. Once paused, the button changes to Resume Capture.
- Resume Capture - Continues the broadcast. Once resumed the button changes to Pause Capture.
- Extend Capture - Allows you to add time to the scheduled event, up to 30 minutes per request (with no total limit). You cannot extend the time of a webcast past the start time of the next scheduled capture for the device.
- When finished, minimize or close the browser window to return to the Presenter view of the live webcast.
Adding Closed Captioning to a Live Webcast
You or your TA may want to provide closed captioning during a live webcast. Please be aware that this feature requires additional configuration. Follow these steps:
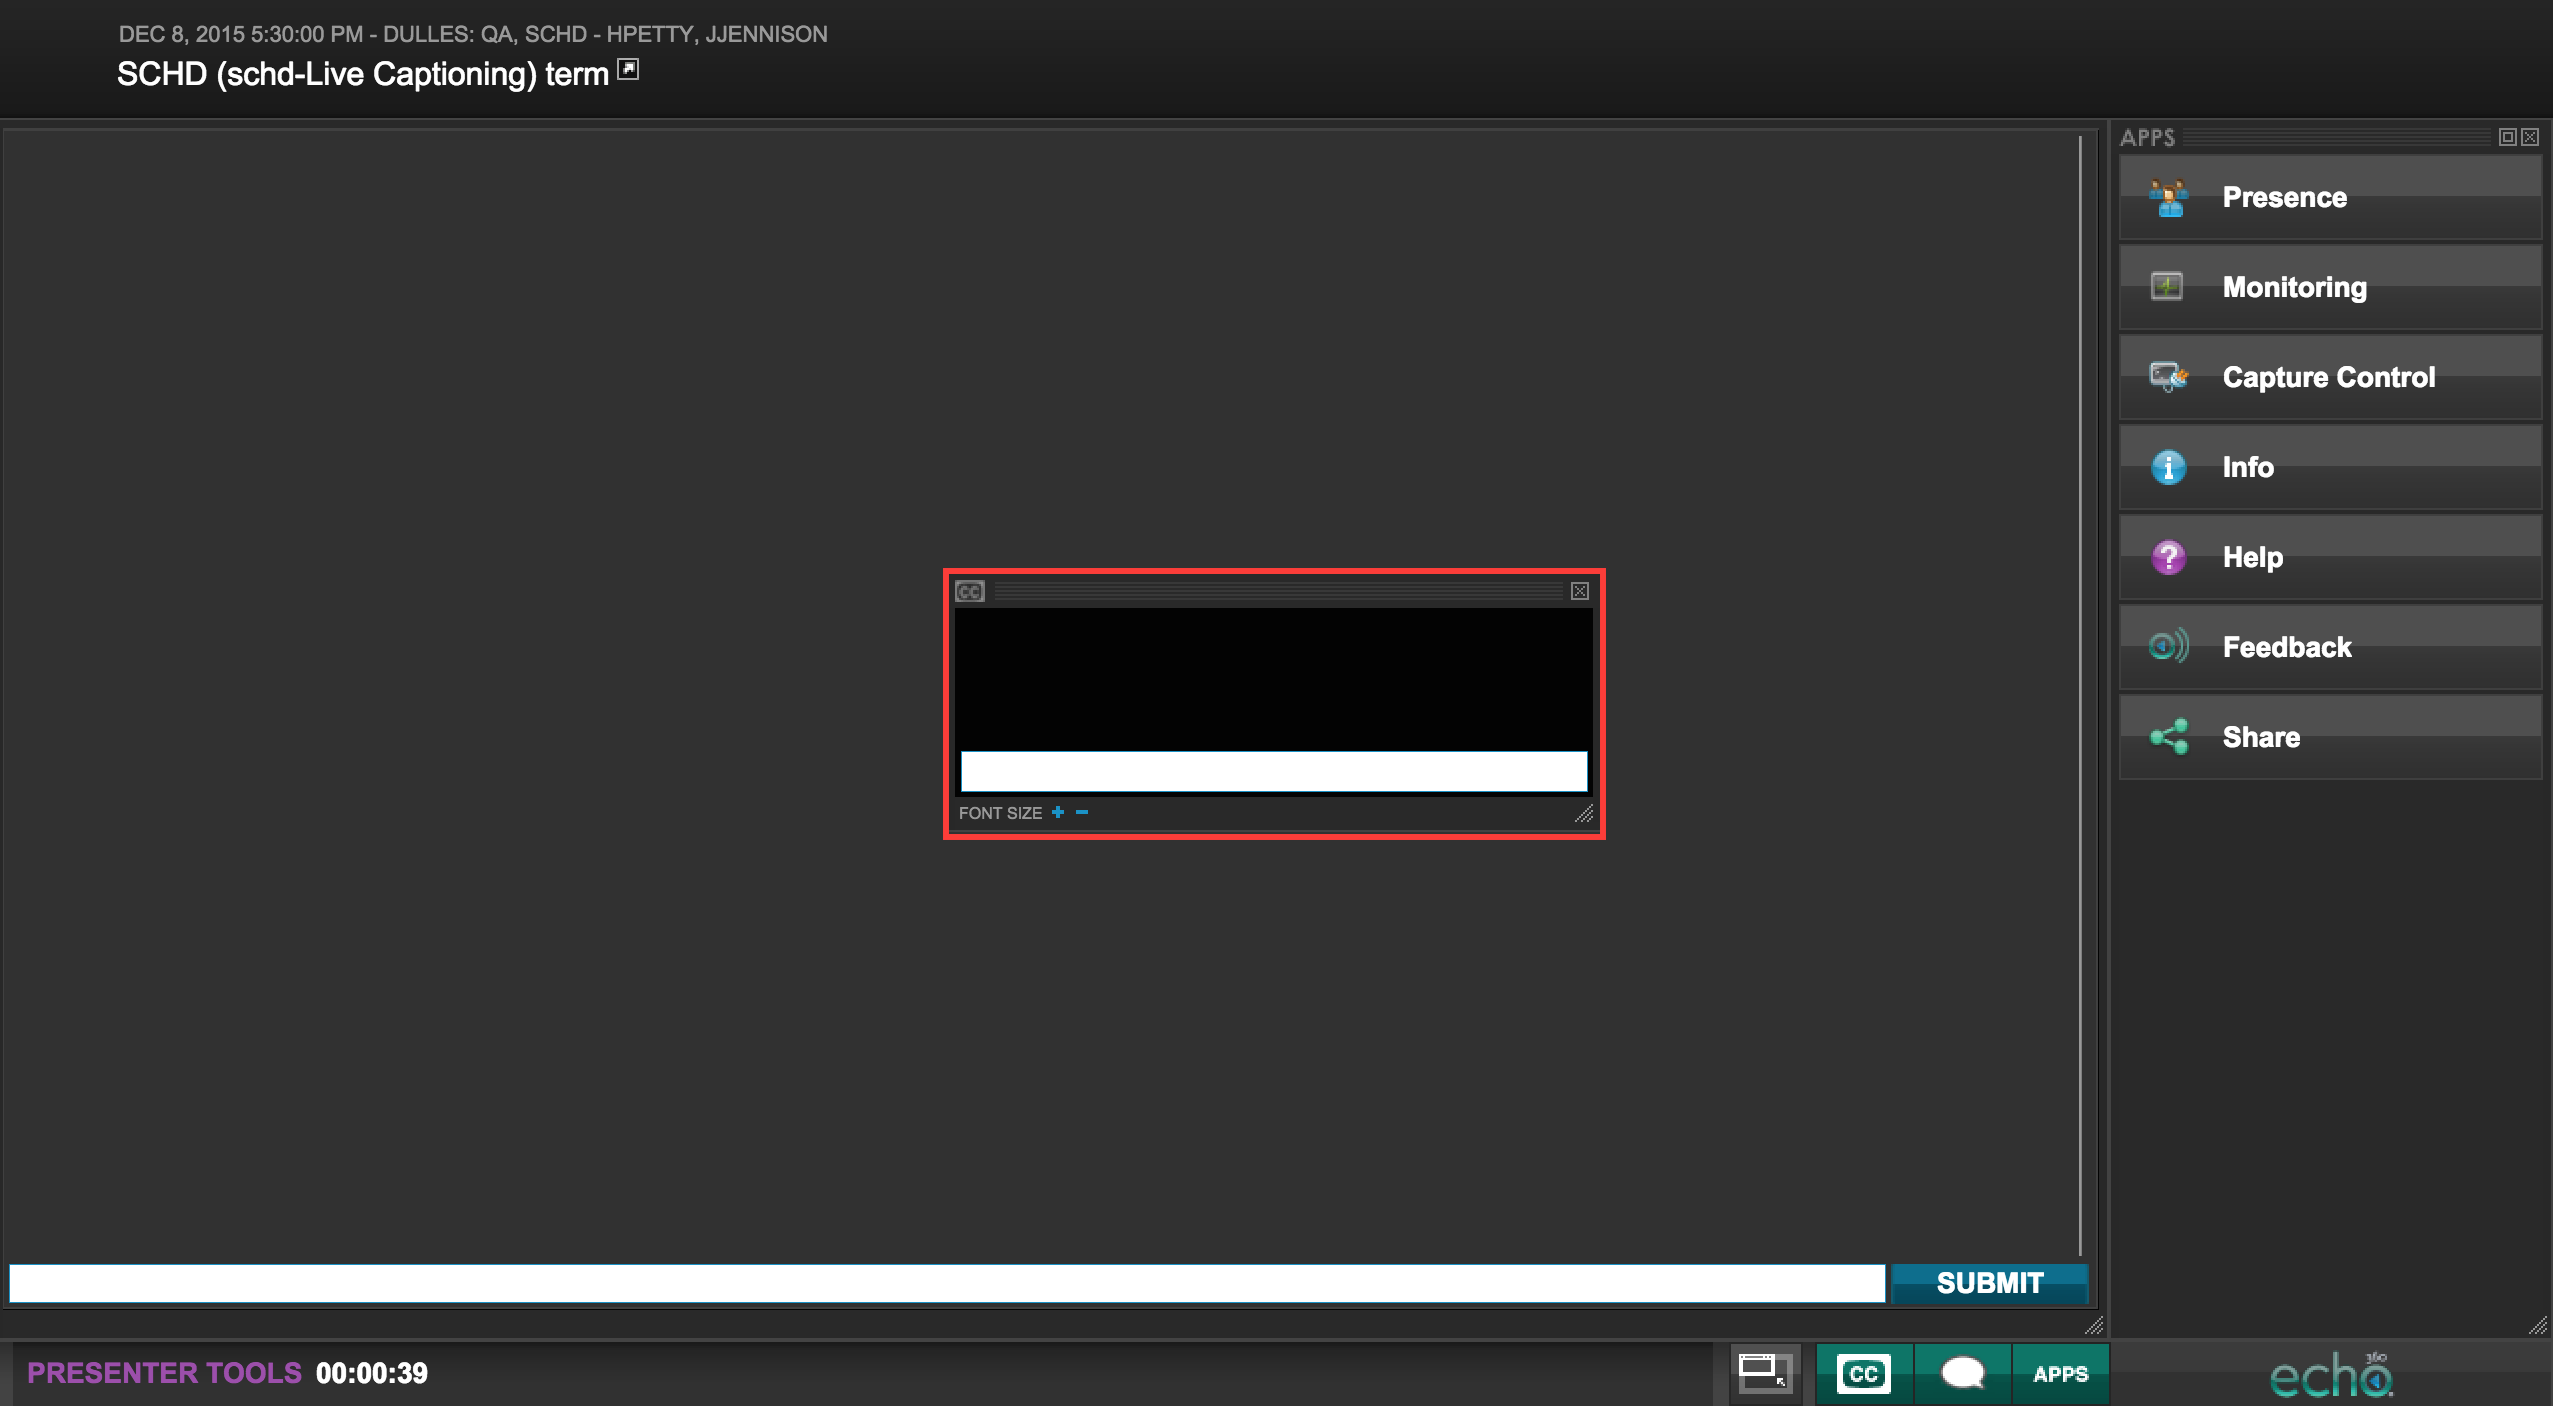
- Log into the webcast as an Academic Staff member, to access the Presenter view.
- Click the Closed Caption button.
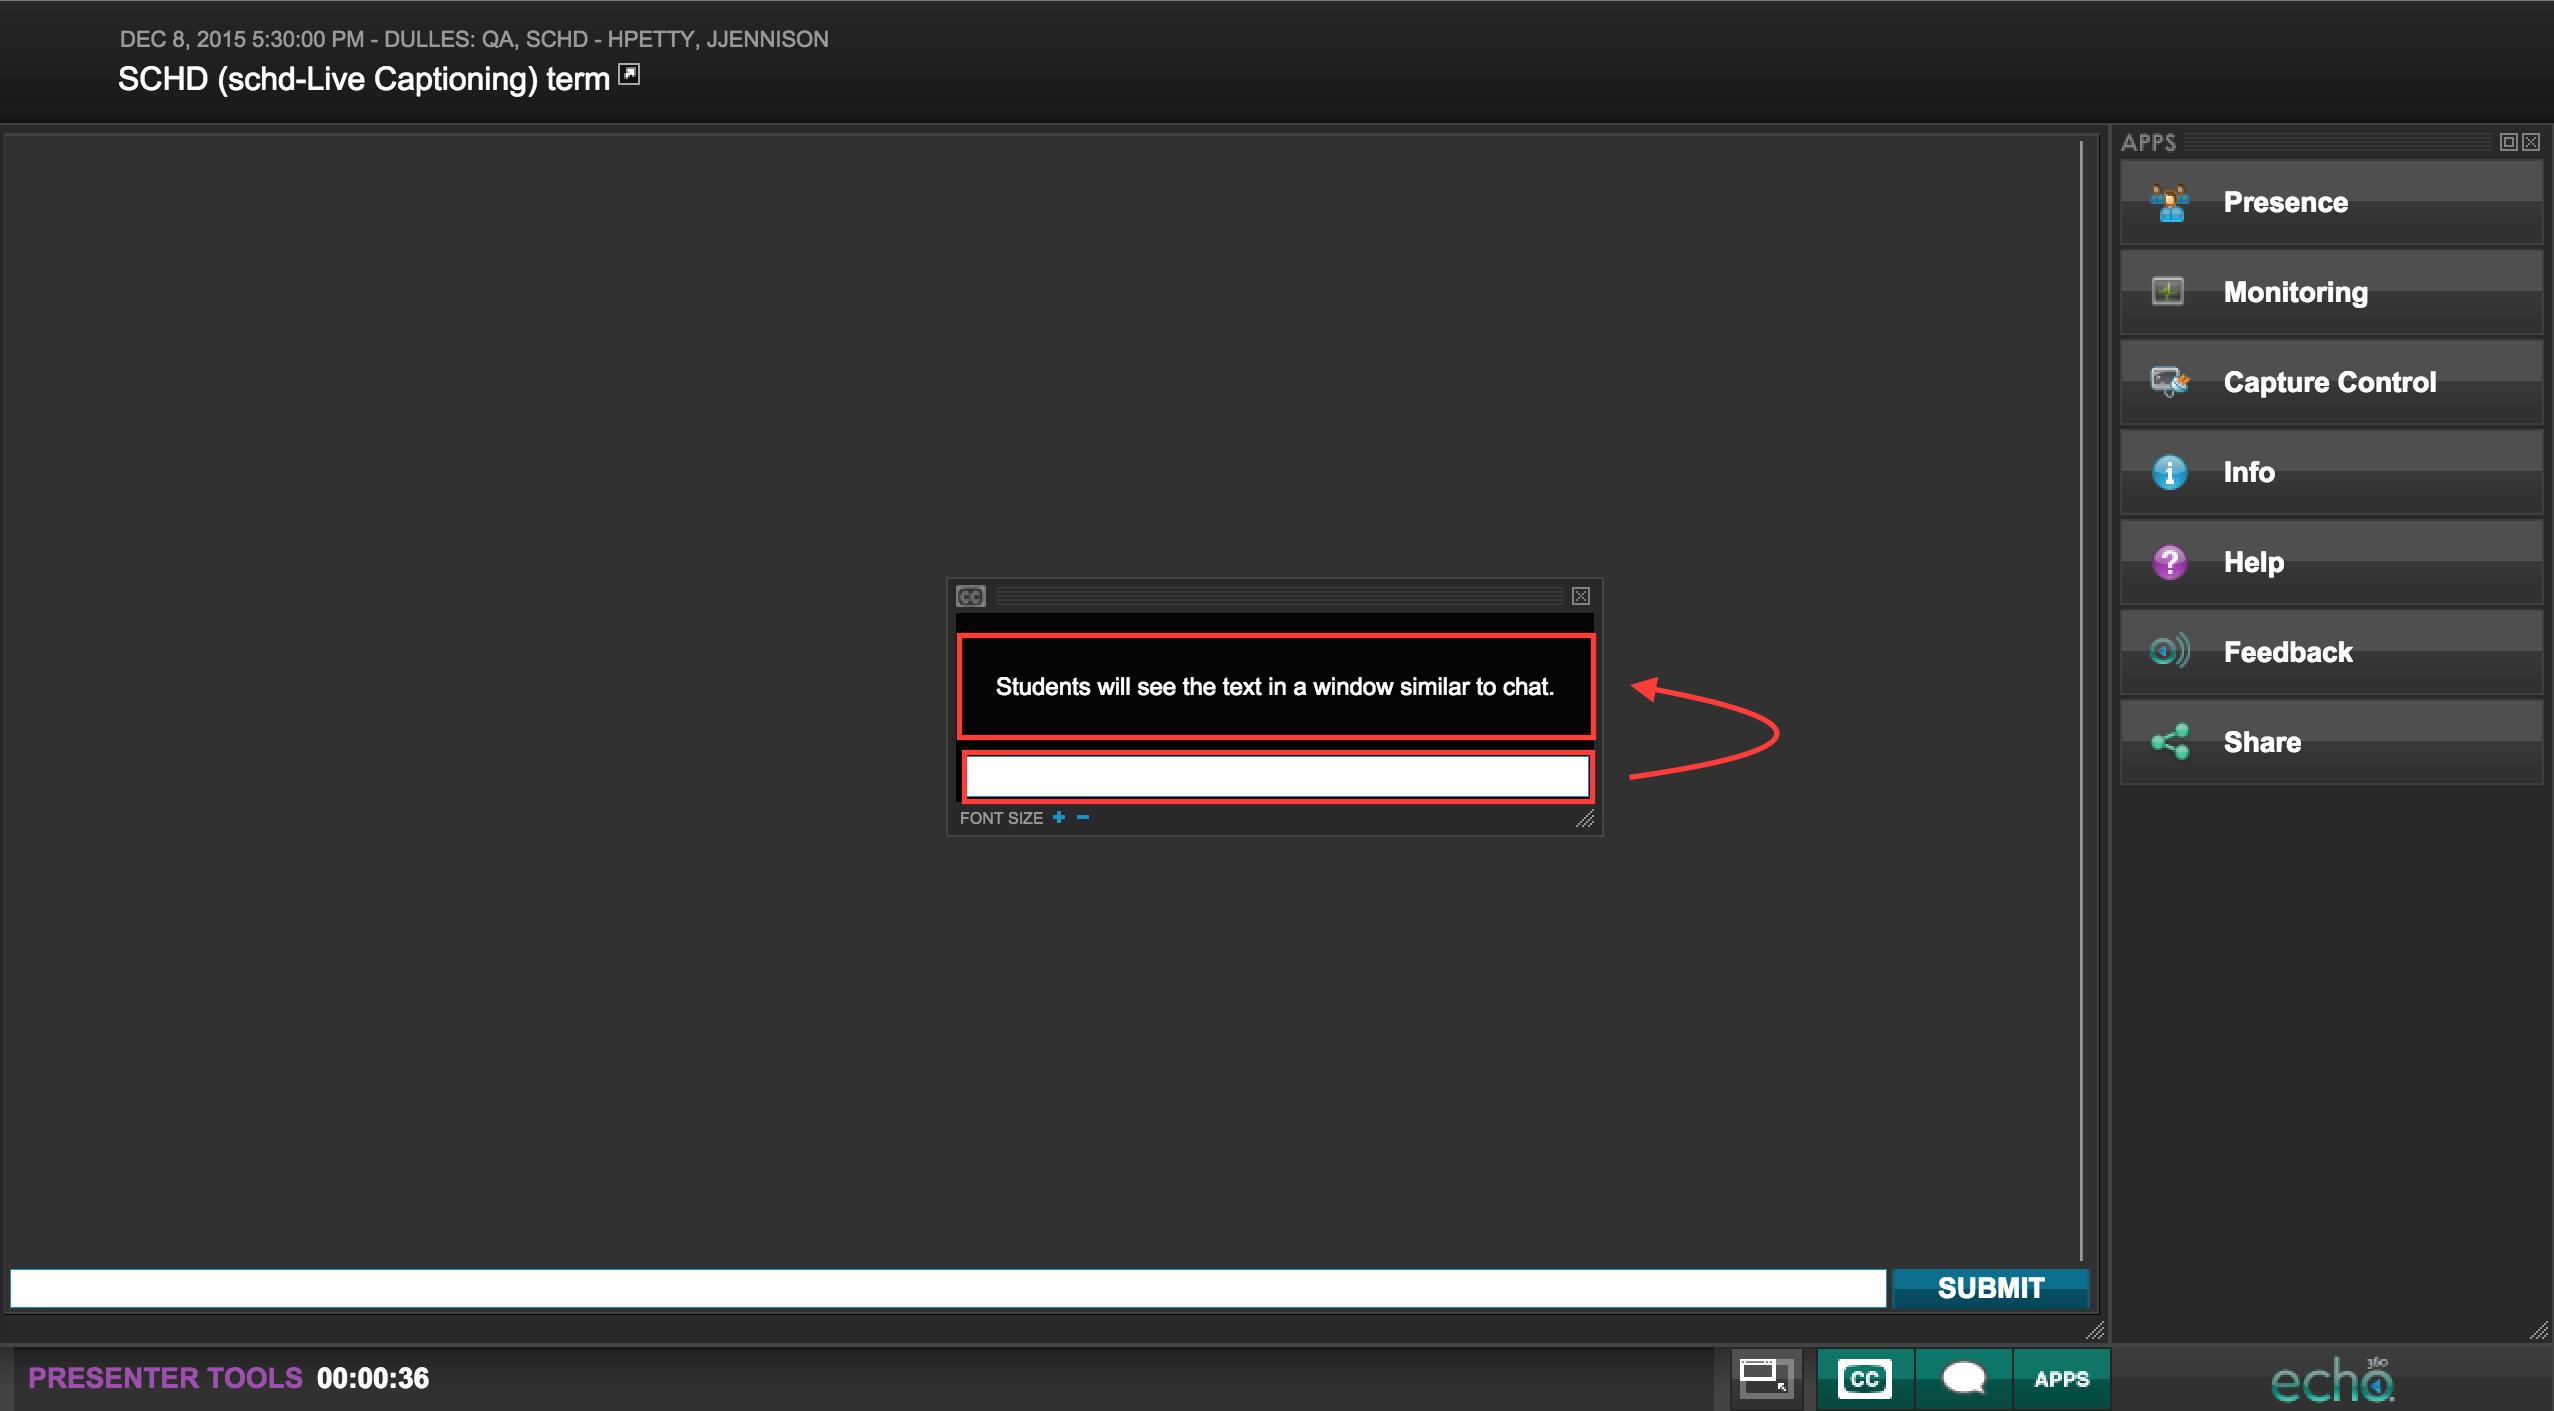
- A captioning window will then appear for use. Start typing captioning into the white text box that appears.
- Press Enter to post your text to Students. The text will then move from the white input field to the black posted box.
- When finished, click the Closed Caption button again to close the captioning window.