Edit Echoes for Academic Staff
In this section:
Overview
You can edit either an Echo (a captured lecture) or additional materials (imported media). For both types of files you can:
- Remove a segment from the middle. You might want to remove:
- Some student remarks
- An exam review
- Remove either the beginning or end sections ("trimming top 'n tail"). You may want to do this to remove unnecessary material.
If the Echo contains:
- Both audio-video and display (such as a PowerPoint file), you can edit either the video, the display, or both
- Only audio-video, you can edit the video only
To edit a file, do the following:
- Open the file to be edited.
- Select the content to be edited. You do this only for files that contain both VGA and video.
- Specify the edits to be made.
- Commit edits, if applicable.
- After editing the file, you can do the following:
- Save the file. This command commits your edits but does not publish the file to students.
- Save and process the file. This command commits your edits and makes the file available to students.
Save a copy to a different course or section.
Save in the Editor is Different From Copy in the ESS
When you save a copy of a file in the Editor, the new file created has the edits you have applied. When you copy a file in the ESS, the new file created is a duplicate of the original file, even if you have applied edits to it.
Open the File
- Log in to the EchoSystem using your Academic Staff user name and password.
- Navigate to Echoes > Echoes.
- Click the relevant tab. Clicking the All tab ensures that your file appears in the list.
- In the file list, hover over the relevant file until the buttons appear, as shown in the figure below.
- Select edit.
- Scroll to the bottom of the page and click Edit Media, as shown in the figure below.
- Wait while the Echo360 Presentation Editor loads.
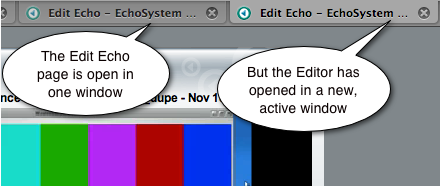
- Notice that the Editor is open in a new active window, but the Edit Echo page is still open in another window, as shown in the figure below.
Select the Content to be Edited
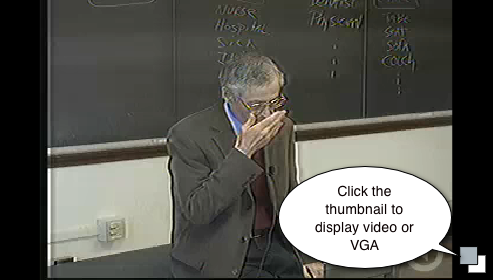
In the Content Pane, click one of the thumbnails in the lower right corner to display either the video or the display content, such as a PowerPoint file. In the figure below, video is displayed.
Specify Edits
Specify a Segment to Remove
You can use either the playhead and buttons or the left and right markers to mark the beginning and end points of the segment to be cut.
To use the playhead and buttons:
- Position the playhead at the start of the cut.
- Click the Start Cut button (left triangle). This marks the start cut point.
- Position the playhead at the end of the cut.
- Click the End Cut button (right triangle). This marks the end cut point.
- Click the scissors (Cut) button.
To use the markers:
- Drag the left marker in to the start of the cut.
- Drag the right marker in to the end of the segment.
- Click the scissors (Cut) button.
Notice that the cut areas appear gray on the timeline, as shown in the figure below.
Notice the Cuts Pane
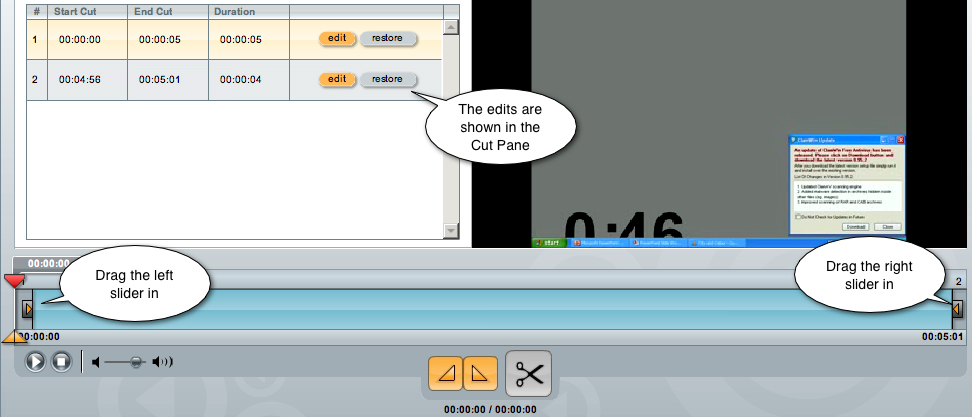
The edits are shown in the Cuts Pane.
- Commit the edits. See Commit Edits.
Specify that the Beginning or End of the File be Removed
- Drag the left slider in to remove the beginning of the file.
- Drag the right slider in to remove the end of the file.
- Notice that the edits are shown in the Cuts Pane, as shown in the figure below.
- At this point, you can either preview the edited file or save it.
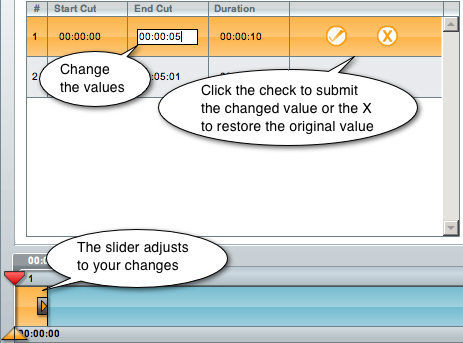
Edit Cuts Using the Cuts Pane
- Select the relevant row in the Cuts Pane.
- Click edit.
Change the values for Start Cut or End Cut, as shown in the figure below.
Commit the Edits to Make Them Take Effect
At this point, you have specified edits, but they will not be made until you commit them in the Cuts Pane. See Commit Edits.
Commit Edits
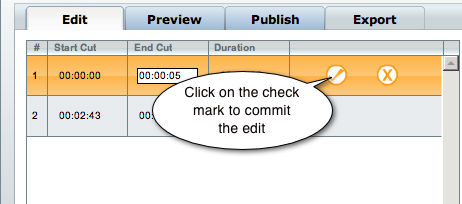
- In the Cuts Pane, click edit for each of the edits you want to commit, as shown in the figure below.
- Click on the check mark to commit the edit, as shown in the figure below.
- Do this for each of the cuts you want to commit.
- If you decide you do not want to make the edit, click restore.
Preview the Edited File
- Click the Preview tab.
- Click the Play button.
Save (or Save and Process) the Edited File
- Click the Save tab. The Edit Overview provides a summary of the edits and the new duration.
- In the Version Description field, enter a title that describes the edits you made.
- Click either Save Edits or Process Edits, as identified in the figure below.
- Save Edits commits your edits but does not publish the file to students.
- Process Edits commits your edits and makes the file available to students.
- Look for a confirmation message saying that the edited media file has been submitted.
- If you see an error message, take a screen shot of it and forward it to your System Administrator.
- Expect an e-mail advising you that the file is ready for viewing.
- To close the Editor, close the tab. The Edit Echo window (which has the details on the Echo you just edited) is now the active window.
- After the edited file has been processed, notice that:
- The title you entered in the Version Description field (which described the edits you made) is listed in the Presentation Media Edits section.
- Two new buttons (Reprocess Media and Restore Unedited Media) have appeared at the bottom of the Edit Echo window, as shown in the figure below.
- Click Restore Unedited Media to delete all of the edits made in every editing session. This restores the file to its original state.
Save a Copy to a Different Course or Section
After you have edited an Echo, you can save a copy (or "save new") to a different course or section.
Follow these steps.
- In the Editor, make all of the edits you want.
- Save the file, using either the Save Edits or Process Edits options.
- Click the Save New tab.
Populate the fields.
Field
Comment
Title
Title for the Echo. You may want to use the same title as you did for the edited Echo. This Echo is an exact copy of it.
Description
You may want to describe why you are exporting this Echo to a different section.
Version Description
Describe the edits made to the Echo. You may want to use the same description as you did for the edited Echo. This Echo is an exact copy of it.
Term
The term ("Winter", "Spring") that you are associating the Echo with. This can be the same as the edited Echo.
Course
The course that you are associating the Echo with. This can be the same as the edited Echo.
Section
The section that you are associating the Echo with. This can be the same as the edited Echo.
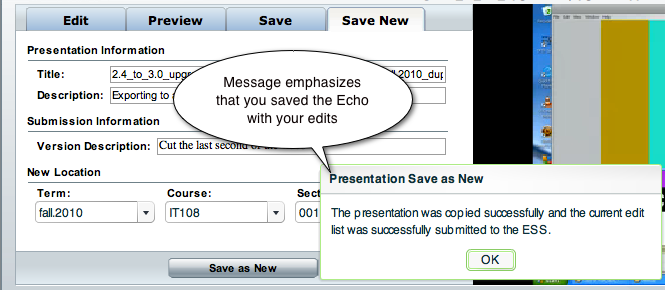
- Click Save. A dialog box advising success appears, as shown in the figure below.
- To verify that the Echo was exported successfully:
- Navigate to Echoes > Echoes.
- Find the new Echo in the list.
Troubleshooting - If Editing Fails
On rare occasions, you receive an error message when you attempt to save an edited Echo.
This may be caused by an over-full .tmp directory. Your System Administrator can correct this by changing the temporary storage location. See Best Practice - Establish a Temporary Storage Location.


