Upgrade the ESS
- Hannah Petty
In this section:
Read the Release Notes BEFORE Upgrading
BEFORE YOU UPGRADE: Review the Release Notes for EchoSystem 5.5.
You should also check the Supported Technologies page to make sure your existing platforms and infrastructure support EchoSystem 5.5.
Overview
The following steps provide an outline of the process you should follow to upgrade the EchoSystem Server (ESS). Links within the procedure jump to the relevant areas on this page with specific instructions for those tasks.
- Verify that the ESS is on a machine with a supported operating system. See Supported Technologies.
- Verify that there is at least 5 GB of free space available in the installation directory/drive.
- Download the software.
- Prepare the MySQL database if you use MySQL.
- If you are upgrading the ESS on a Linux server, do the following:
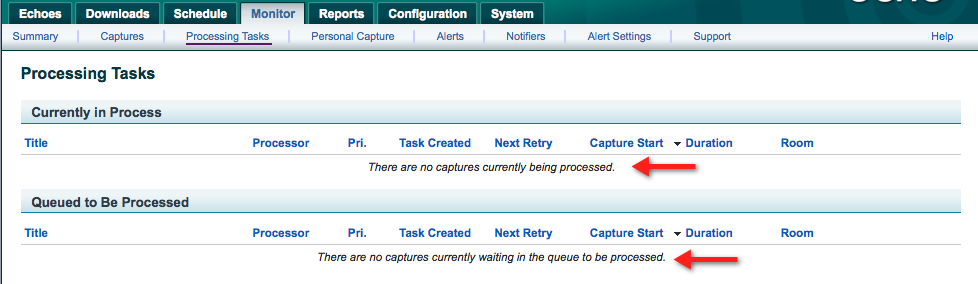
- Navigate to Monitor > Processing Tasks and check both Processing Tasks queues to be sure they are completely empty, as shown in the below figure. This is necessary because a permissions issue causes any tasks in the processing queues to be lost during upgrade.
- Check the ulimit setting for the "maximum number of open file descriptors per process" on the server; it must be set to at least 64K (64x1024) in order for ESS upgrade to succeed. If this setting is lower, the installer will ask to change it. To view a list of the per-process resource limits currently enforced by the operating system, log on as the 'root' user and execute the command
ulimit -a. For more information, see the note in the Upgrade on Linux section below.
- Navigate to Monitor > Processing Tasks and check both Processing Tasks queues to be sure they are completely empty, as shown in the below figure. This is necessary because a permissions issue causes any tasks in the processing queues to be lost during upgrade.
- Install the upgrade. Procedures for Windows and Linux appear below.
- Check for retired devices. If you have venues with retired devices, you must install supported devices in those venues and verify that capture schedules point to those new devices.
- Report upgrade problems if you encounter them.
- If you have venues with Classroom Capture (sometimes called EchoCapture software, Software Capture, or Podium Capture), continue by upgrading the software on podium PCs in those venues. See Install Classroom Capture Software.
Download the Software
The installation software is provided through a compressed file downloaded from the Echo360 customer support portal. Save it to a directory location on the hard drive of the machine where the EchoSystem Server (ESS) will be run.
Prepare the MySQL Database
If you do not use the MySQL database you can skip this section.
The ESS installer handles all necessary database interactions during the upgrade process, however, please follow these additional steps.
- Ensure that you are using a supported version of MySQL. See Supported Technologies.
- Convert the Latin-1 character set to the UTF-8 character set. See Convert Latin-1 to UTF-8.
- Check the collations of the database and tables. You may need to change the collation of the database. See Check Database and Table Collations.
- If you expect to have captures of three hours or longer: Increase the max_packet_size parameter in the my.cnf file. See Increase the max_packet_size Parameter.
Convert Latin-1 to UTF-8
The default MySQL configuration uses the Latin-1 character set, but the ESS requires its database to use the UTF-8 character set. The ESS upgrade process fails if the database uses the Latin-1 character set.
This KB (Knowledge Base) article (Converting a MySQL database character set) explains how to convert the Latin-1 character set to the UTF-8 character set.
Check Database and Table Collations
The ESS allows you to choose the UTF-8 compatible collation you use. Therefore, to respect your choice, the ESS does not specify a collation when it creates tables during a new install or during an upgrade. It uses the default collation for the database. If the default collation is changed without converting the existing tables, this can cause a problem during upgrade when new tables are created with a different collation. This occurs most often when the ESS database is dumped and loaded into a new server that has a different default collation.
You must determine if the collations for the database and tables match. If they do not, you must change the default collation for the database to match the collation of the existing tables.
Follow these steps.
Check the collation for several existing tables. Type this command:
show full columns from <database_name>.<table_name>;
Check the default collation for the database. Type this command:
use <database_name>;
show variables like 'collation_database';
If the collations do not match, change the default collation for the database to match the collation of the existing tables. Type this command:
alter database <database_name> collate 'some_collation_name'
Increase the max_packet_size Parameter
Each capture event creates and stores in the database an xml specification that includes all the necessary information and links to supporting images and media. Long captures, which have large sets of thumbnail images, can create very large specifications. The default limit for BLOBS within MySQL is 1 MB. This may be too small for captures of three hours or longer. If you expect to capture events longer than three hours, increase the max_packet_size parameter in the my.cnf file.
Capture events that create specifications larger than the max_packet_size are captured and processed, but they do not appear in the list of presentations.
- Stop MySQL. Consult the MySQL documentation for instructions.
- Locate the my.cnf file on your system.
- Open it in an editor.
Modify the max_packet_size parameter, changing it from 1 MB to 2 MB. After editing, the line in the file should look like this:
max_allowed_packet = 2M
- Save the my.cnf file.
- Restart MySQL.
Upgrade on Windows
There is one version of the Windows installer available for download from the Echo360 Customer Support website, supporting 64-bit distributions. You must be a user with administrator rights to perform the upgrade.
These instructions assume that you used the default directories for the installation of your original ESS and that you are not changing the location. If you are changing the installed location, even if you are not changing the host server, contact Echo360 Technical Support for assistance.
- Navigate to Administrative Tools > Services.
- Select the EchoSystem Server service.
- Click Stop.
- Select the Wowza Media Server service.
- Click Stop.
- Back up the ESS database and application. See Upgrade to EchoSystem 5.5.
- Extract the zip file downloaded from the Echo360 website. Navigate to the expanded directory and double-click the installer executable.
- Follow the instructions on the screen to install the upgrade.
- On successful completion of the upgrade, the ESS service is started automatically by the installer.
- The ESS upgrades the Wowza Media Server to version 3.5 if you are using an internal configuration of Wowza.
- Wowza is not started automatically. To start the Wowza Media Server service:
- Navigate to Administrative Tools > Services.
- Select the Wowza Media Server service.
- Click Start.
Upgrade on Linux
There are two versions of the Linux installer available for download from the Echo360 Customer Support website, supporting either 32-bit or 64-bit distributions. The upgrade process is identical for either version, as described below.
You must be a user with root privileges or use the sudo command, which requires your password, to perform the upgrade.
These instructions assume that you used the default directories for the installation of your original ESS and that you are not changing the location. If you are changing the installed location, even if you are not changing the host server, contact Echo360 Technical Support for assistance.
Maximum Number of Open File Descriptors Must Be At Least 64K
If you are upgrading on Linux, the ulimit setting for the "maximum number of open file descriptors per process" on the server MUST be set to at least 64K (64x1024) in order for ESS upgrade to succeed. If this setting is lower, the installer will ask to change it. If you select N (no), the upgrade will stop and exit.
To view a list of the per-process resource limits currently enforced by the operating system, log on as the 'root' user and execute the command ulimit -a. For more details, do a man ulimit at the Unix command prompt, or see http://linux.about.com/library/cmd/blcmdl1_ulimit.htm.
Stop the EchoSystem Server service (daemon). From the terminal prompt, type:
sudo /etc/init.d/echosystemserverd stop
Stop the Wowza Media Server service (daemon). From the terminal prompt, type:
sudo /etc/init.d/WowzaMediaServer stop
- Back up the ESS database and ESS application.
- Download the EchoSystem 5.5 installer from Echo360. Both 32-bit and 64-bit versions are available for download.
- Extract the tar.gz file and navigate to the expanded directory.
The installer binary file may need the right permissions set to run as an executable. From the terminal prompt, type:
sudo chmod +x <installer_name>.bin
Launch the binary file. From the terminal prompt, type:
./<installer_name>.bin
- Follow the instructions on the screen.
- Look for a warning about Windows XP devices. Continue with the upgrade or cancel. If you continue, be sure to check for retired devices.
- On successful completion of the upgrade, the ESS service is started automatically by the installer.
- The ESS upgrades the Wowza Media Server to version 3.5 if you are using an internal configuration of Wowza.
Wowza is not started automatically. To start the Wowza Media Server service, from the terminal prompt type:
sudo /etc/init.d/WowzaMediaServer start
Report Upgrade Problems
If the upgrade procedure produces any error or failure messages the installer reverts back to the earlier instance. In this event, contact Echo360 Technical Support for assistance.