LTI-Based Publishing
- Hannah Petty
In this section:
Overview
EchoSystem LTI (Learning Tool Interoperability) allows you to integrate the EchoSystem with a learning management system (LMS) such as Canvas, Moodle, or Blackboard. Basic LTI communication consists of a content provider (EchoSystem) and a content consumer (the LMS).
The list below shows LMSs supported by LTI-Based publishing. These integrations require EchoSystem 5.2 with Service Pack 2 or higher:
- Blackboard, version 9.1 Service Pack 9 or higher
- Moodle, version 2.7 or higher
- Canvas
- Desire2Learn (D2L), version 9.4 or higher
- Sakai, version 2.9.1 or higher
As of the 5.5 release of EchoSystem, we will only be supporting LTI-based publishing. We highly recommend that you change your current ESS configuration to use LTI instead. LTI offers these advantages:
Canvas LTI Profile Requires Additional Fields
If you are using Canvas as your LMS, see Canvas LTI for instructions. Configuring the Canvas LTI profile requires additional steps not provided below.
High-Level Procedure
In order to pass information to the LMS, the EchoSystem Server (ESS) and the LMS must be configured to communicate securely with each other. Configuring LTI integration with an LMS consists of the following phases:
- Add the LTI into the ESS configuration.
- Add the ESS as an External Tool in the LMS.
- Identify or create courses in the LMS.
- Add the Course IDs from the LMS into the section configuration on the ESS (External Course IDs).
Once configured, users can log into the LMS and seamlessly access each of their sections.
Add LTI Profile to the ESS
Configure HTTP/HTTPS System Settings First
Be sure you have configured your System Settings before adding the LTI profile to the ESS. In particular, the Application Network Settings must remain static. If you change the HTTP/HTTPS configuration in the Application Network Settings after creating the LTI profile, you will have to delete and re-create the External Tool on the LMS. This is because changing the HTTP/HTTPS settings also changes the ESS launch URL for the LTI tool.
Follow these steps to add the LTI profile to the ESS. Once the LTI profile exists, you will use the fields generated to Add the ESS to the LMS as an External Tool.
- On the ESS, navigate to Configuration > LTI
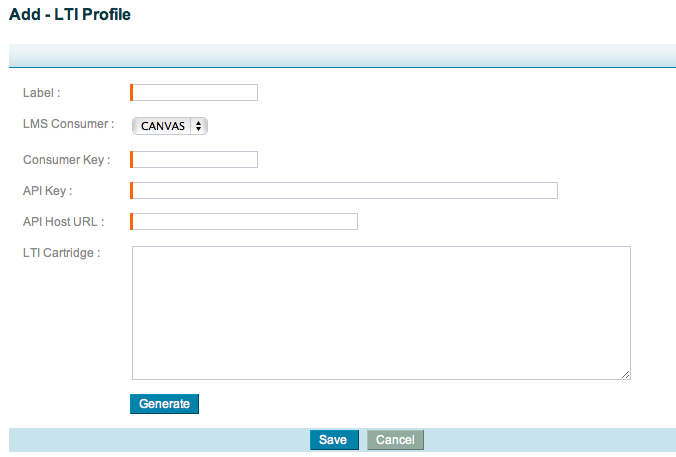
- Click Add to open the Add LTI form, shown in the below figure.
- From the LMS Consumer drop-down list, shown below, select the LMS you are using.
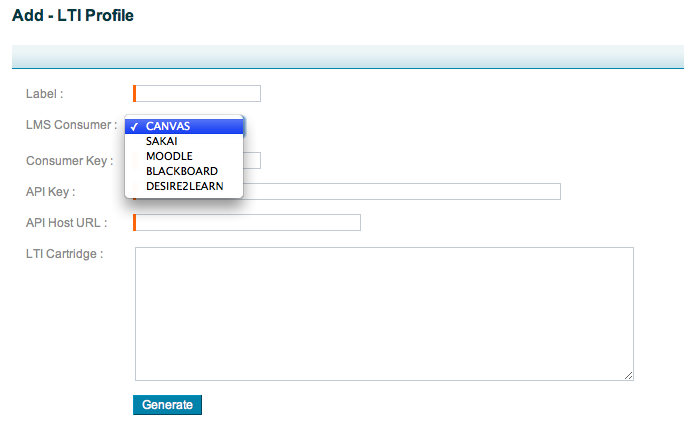
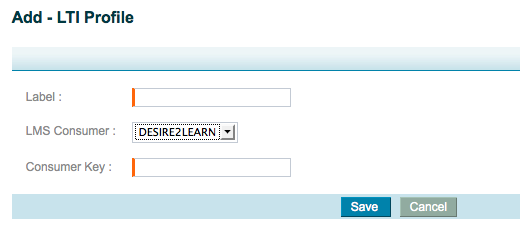
- Notice that when you select an LMS other than Canvas, the Add Profile page changes, removing several of the fields, as shown in the figure below. See Canvas LTI for instructions on configuring a Canvas LTI profile.
The following table lists the Add LTI Profile fields and describes the information to be entered in each:
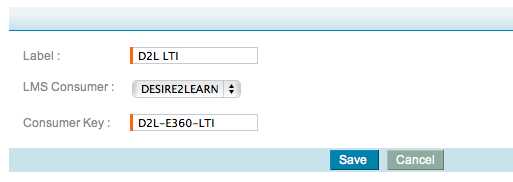
LTI Profile Field Description and Value to be Entered Label Enter a name for this LTI profile. This identifies this LTI configuration in the ESS interface. LMS Consumer Select the LMS you are using from the drop-down list. If you are using Canvas, see Canvas LTI for configuration instructions. Consumer Key Enter a term or short phrase with no spaces that identifies this LTI and is easy to remember. You will enter this Consumer Key into the LMS interface when you Add the ESS to the LMS as an External Tool. This must be different for each LTI profile you create (if you create more than one). - Complete the fields using the information provided in the above table. The following figure shows a completed Add Profile page.
- Click Save. The completed LTI profile appears, shown in the below figure, including the Consumer Key, Shared Secret, and Launch URL fields, which you will use to configure the LTI Tool on the LMS.
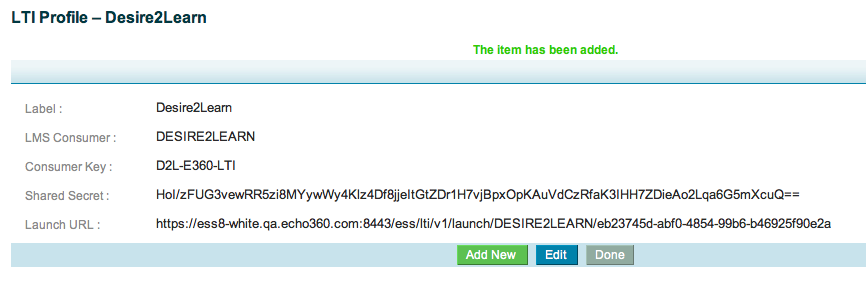
- From the completed LTI profile, copy the following items into Notepad or other text editor, for later pasting into the proper fields when creating the ESS as an External Tool in the LMS.
- Consumer Key
- Shared Secret
Launch URL
Canvas LTI Profile Shows Additional Fields
The above list applies to all LTI profiles except Canvas. As stated above, creating the Canvas LTI profile requires additional steps not provided here. The Canvas LTI profile also shows additional fields not discussed here. Refer to Canvas LTI for details.
- When you have copied the appropriate information, click Done. The LTI screen appears, showing the new LTI profile along with any others already created.
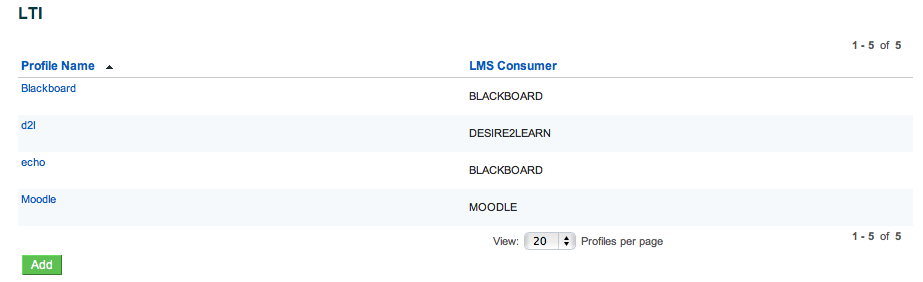
When necessary, you can access LTI profile information by clicking the Profile Name in the LTI screen shown above.
Seamless Only vs Authentication Required
If Seamless Only is used on a section, then students must be authorized via an LTI or Seamless link for the specific section in the LMS in order to view content for that section.
If Authentication Required is used on a section, then any authenticated student can access the content for that section.
Add the ESS to the LMS as an External Tool
The ESS must be configured as an External Tool for the LMS. Basic LTI communication is configured by copying the LTI profile fields from the ESS to the LMS.
While the API interaction between the systems is effectively the same, configuration instructions differ, depending on the LMS you are using. Detailed instructions are available in the following pages:
After the external tool is configured on the LMS, use the information below to configure sections on the ESS to deliver the appropriate content to each LMS user.
Configure ESS Sections to Publish to LMS Courses
In order for the ESS to know what content belongs to the logged-in LMS user, each ESS section needs to be associated with the corresponding LMS course. The External System ID field in the section page, shown in the below figure, provides this association. For more information on creating and configuring sections, see Manage Sections.
![]()
Populate this field with the ID number for the corresponding Course or Section ID in the LMS. The table below describes where, in each LMS, the ID can be found.
| If you are using this LMS... | The Course number to enter into the External ID field is found here: |
|---|---|
| Blackboard | Navigate to the Course page then select Customization > Properties. Use the Course ID found on the Properties page. |
| Moodle | Navigate to the Course page, then select Edit Settings. Select the value in the Course Short Name field the Edit course settings page. |
| Sakai | Navigate to My Workspace > Realms and use the Provider IDs for the courses listed. Where there are multiple sections for a course, you will see multiple Provider IDs separated by a + (plus sign). |
| Desire2Learn (D2L) | Navigate to the Course page in D2L and use the Course ID number located in the URL. In the sample URL below, the External System ID to use would be 2040773. https://riverland.ims.mnscu.edu/d2l/home/2040773 |
| Canvas | In the URL of the Section page in Canvas. Navigate to the Course page and click on the section link. In the sample URL below, the External System ID for the section would be 1107705.
|
When a student logs into the LMS and navigates to each course, a link for the EchoCenter for the appropriate section is automatically shown through the course page of the LMS interface.