Manage Sections
- Hannah Petty
In this section:
Overview
Sections (called "modules" in Great Britain) define the offering of a course and are associated with a term. Sections may also be called "offerings" or "courses". Sections are the items scheduled for capture. You need at least one section per course and can have as many sections as you need for that course. Each section is associated with a term. Using our "Introduction to Economics" course example, Introduction to Economics (ECON101) is the course name. This course has three sections during the Fall 2009 term and four sections during the Spring 2010 term. Each section is created within the course and assigned to the appropriate term. Captures are then based on a section.
If You Want to Display "Module" not "Section"
You can change some terms shown in the ESS interface by changing the language preference in your browser to British English (en-gb). See Show the ESS in British English for details.
Add a Section
- Navigate to Schedule > Courses. The Courses page appears.
- Click a course link. The Course Details page appears.
- In the Sections area of the page, click the Add button. The Add New Section page appears.
- Configure the new section by reviewing the configuration details below.
- To add or configure default publishers for the course's section, click the Add Publishers button.
- Click Save.
Edit at Any Time
You can edit a section at any time by hovering your mouse over the section on the Section page and clicking the edit link.
You may sometimes want to add many sections all at once or to change properties of many sections. You can do this efficiently by using the import and export capabilities with a spreadsheet program such as Excel.
Section Configuration Options
You can configure sections to enable automation and streamline the user interface. Most section defaults are inherited from the organization. Some of these default settings can be changed in the section configuration. See Organization Settings for information on configuring the organizational defaults.
The sections that follow provide details on each of the Section Configuration options available.
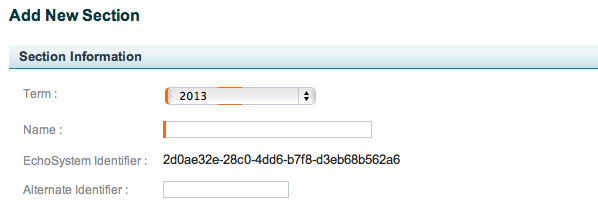
Section Information
The figure below shows the Section Information configuration options. Below the figure is a table that describes the settings available.
Setting | Description | Inherited From |
|---|---|---|
Term | Identifies the associated academic term for the section. | Parent Organization > Child Organization |
Name | Defines the name of the section. | N/A |
| EchoSystem Identifier | Unknown macro: {multi-excerpt-include} | |
| Alternate Identifier | The globally unique identifier (GUID) used by an external system (such as an LMS or LDAP) to identify the object. Entering an Alternate ID is optional, but allows you to use the external system's GUID (not the EchoSystem Identifier) when making API or other system calls. See API Documentation for further explanation. A Course and a Section Can Have The Same Alternate ID The Alternate Identifier must be unique for each ESS object type, but you can use the same ID for different types. For example, you can have a course with an Alternate ID of ECON101 and a Section with an Alternate ID of ECON101. This is useful if the external system recognizes courses and sections as the same object type whereas ESS does not. |
People and Section Roles
The figure below shows the People and Section Roles configuration options. You must assign at least one person to the section.
To assign a person to a section, select the Person then a Section Role from the drop-down lists, then click Add.
When you create a schedule for the section, you can select a subset of the roles configured here for that particular schedule, if appropriate.
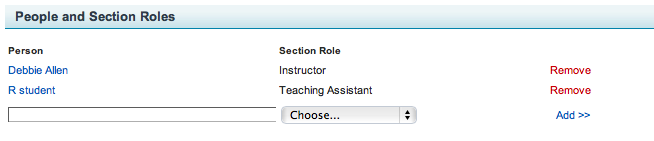
The table below describes the settings available.
Setting | Description |
|---|---|
Person | Lists all users with the Academic Staff role for the organization. You must add users to the organization first as Academic Staff before you can assign that user a section role. The person you select here can publish recordings to this section from Personal Capture (if licensed for Personal Capture) and select this section for Ad Hoc captures. |
Section Role | Lists all section roles for persons assigned to this section. Options are Instructor, Student Presenter, Teaching Assistant, and Guest Presenter. Best Practice: Assign the Teaching Assistant Role if the Section Has Live Webcasting Enabled If the section may webcast live, it is good practice to assign a Teaching Assistant to the section. Some Instructors will manage chat themselves, but others prefer to assign this duty to a Teaching Assistant. |
A Word about "Default Presenters"
In some cases, you will see the Default Presenter assigned to a section or schedule. This occurs when the only person assigned to the section has been deleted from the system. Every section MUST have a person assigned, and to fill the void, the ESS automatically assigns the Default Presenter. The Default Presenter is then also passed through to scheduled captures for the section.

The Default Presenter is not a real person; it is a system generated user and cannot be deleted. Once you assign a new person to the section (to replace the deleted user), you can remove the Default Presenter from the section, and edit any upcoming Schedules to use the assigned person and not Default Presenter.
To see which schedules have Default Presenters assigned, navigate to Schedule > Schedules and then:
- Filter the list and sort by Academic Staff.
- Specify "Default Presenter" in the Keyword Search text box.
Changing only a few schedules can be done individually. See Manage Schedules with Default Presenter as Instructor. However, if a large number of schedules must be changed, you may want to use the Import Schedules feature.
Media Settings

Setting | Definition | Inheritance |
|---|---|---|
Delete Original Media? | Parent Organization > Child Organization > Section | |
Days to Keep Originals | Parent Organization > Child Organization > Section |
Echo Deletion Settings
The figure below shows the Echo Deletion Settings options. Below the figure is a table that describes the settings available.

Setting | Definition | Inheritance |
|---|---|---|
Automatically Delete Echoes? | Parent Organization > Child Organization > Section | |
Days to Keep Echoes | Parent Organization > Child Organization > Section |
Echo Defaults
The figure below shows the Echo Defaults configuration options. Below the figure is a table that describes the settings available.

Setting | Definition | Inherited From ... |
|---|---|---|
Echoes Initially Unavailable? | See Echo Defaults settings for the organization. Live Streaming Unavailable if Checked If you are configuring this section for Live Webcasting, this box must be unchecked. If only certain schedules for this section are to be live webcasts, you can uncheck this box for those particular schedules. See the Echo Defaults section of Create a New Schedule for more information. | Parent Organization > Child Organization |
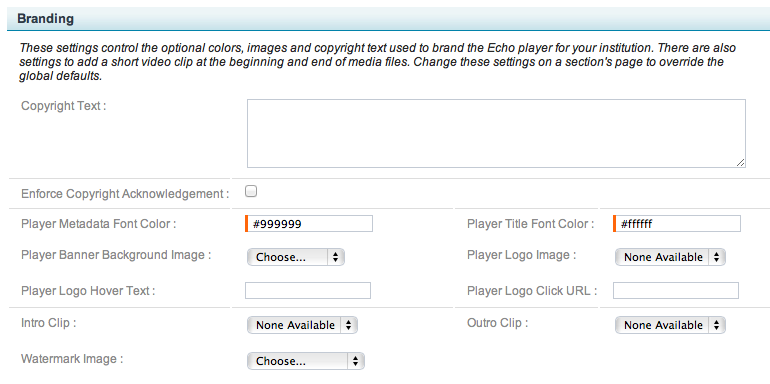
Branding
All branding settings are inherited from the organization. See Branding settings for the organization for descriptions of the settings.
Enforcing copyright acknowledgment prevents Echo playback from embedded EchoPlayers. If you or your users plan to embed EchoPlayers for this section, the Enforce Copyright Acknowledgement box must be unchecked.
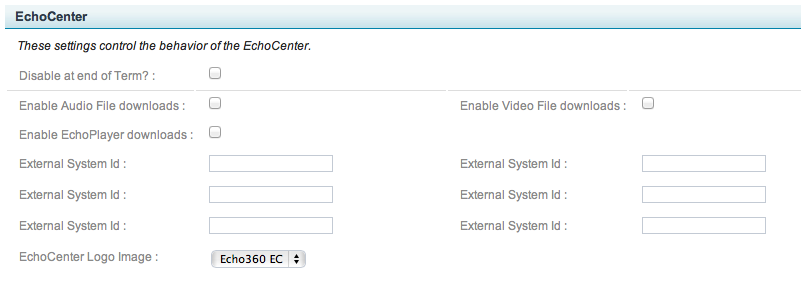
EchoCenter
All EchoCenter defaults for the section are inherited from the Organization, except for External System IDs, which are specific to each section.
The figure below shows the EchoCenter configuration options. Below the figure is a table that describes the settings available. Additional details are available in the EchoCenter section of the Organization Settings page.
Setting | Definition | Inherited From |
|---|---|---|
Disable at end of Term? | If checked, the EchoCenter page for the course will be disabled when the term ends. | Parent Organization > Child Organization |
Enable Audio File downloads | If checked, the EchoCenter page provides an Audio file (Podcast) download link. It appears on the Info tab for an Echo. This allows users to download the audio recording of the Echo for offline listening. | Parent Organization > Child Organization |
Enable Video File downloads | If checked, the EchoCenter page provides an Audio file (Vodcast) download link. It appears on the Info tab for an Echo. This allows users to download the video of the Echo recording for offline viewing. | Parent Organization > Child Organization |
Enable EchoPlayer downloads | If checked, the EchoCenter page provides an EchoPlayer download link. It appears on the Info tab for an Echo. This allows users to download the full EchoPlayer media experience along with the content of the Echo. This is useful for instances where available internet speeds for students are not fast enough to allow streamed viewing over the internet. | Parent Organization > Child Organization |
External System Id | External System Id fields are not inherited from the organization. They appear only here, on the section page. If you have a learning management system (LMS), populate this field with the LMS ID for the course or section. If you are using LTI-Based Publishing, the population of this field is required in order for the ESS to provide the appropriate content to the LMS user. See Configure ESS Sections to Publish to LMS Courses for a table that describes where in the LMS to find the course or section ID to enter into this field. Multiple External System Id fields are available in the event you need more than one. For example, you may have multiple sections in the LMS that link to a single ESS section. Or you may use more than one LMS that needs to connect to a single ESS section. | N/A |
| EchoCenter Logo Image | Allows you to select an image that will appear on EchoCenter pages. You must first add the image to the branding repository. See Manage the Branding Files Repository. | Parent Organization > Child Organization |
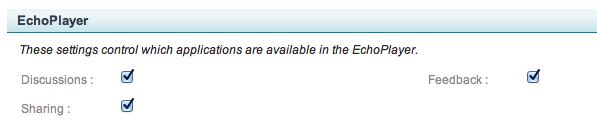
EchoPlayer
All EchoPlayer settings are inherited from the organization. See EchoPlayer settings for the organization for details about the settings.
Product Groups
The Product Groups setting lets you set a default product group for the section, overriding the organization (global) defaults. You might want to do this when:
- You know that a certain section will always use a specific product group as a normal part of its schedule.
- You have configured a special events section to use for live webcasts of specific events. In this case, you can configure those sections to use a live-capable product group by default.
Select a product group that is likely to be used for most if not all schedules for the section.

The Product Groups default setting is inherited from the organization. See Product Groups settings for the organization for details about these inheritances.
Security Settings
The Security Settings area of the Edit Section page shown in the figure below allows you to select a security module for the section. This determines how (or if) students will be authenticated. The options in the list are determined by what Security Modules you have configured. The Security Setting configured for the Organization appears as the default.
If you do not require authentication, students can view Echoes or live webcasts easily, but chat and other collaboration capabilities are disabled.
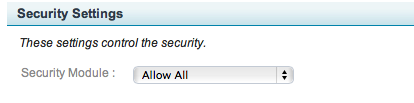
Allow All does not authenticate users for access, and, therefore, implements the Standard version of the EchoCenter, without collaboration capabilities or statistics information.
Authentication Required uses either the ESS user information or an external Trusted System such as CAS or Shibboleth to authenticate users. You can also configure the LMS (like Blackboard or Moodle) as a trusted system to authenticate users. This configuration requires users to access EchoCenter through the LMS.
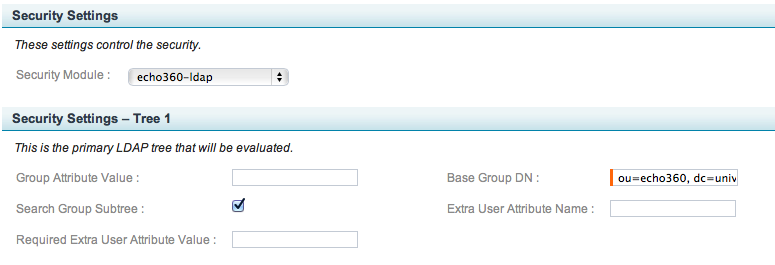
LDAP allows you to use an external LDAP system for user authentication. See LDAP Authentication for more information.
LTI-Based Publishing Requires Authentication
If you are using LTI-Based Publishing, you MUST use either Seamless or Authentication Required as the security module for sections to be presented through an LTI integrated system.
Seamless Only requires the use of an LMS (such as Blackboard or Moodle) or another third party system to pass through user credentials and allow user access.
If you select an LDAP security module, additional fields appear, as shown in the below figure. The section inherits the default Tree 1 settings from the LDAP security module.
Support
The Support settings are inherited from the organization. See Support settings for the organization for details about the settings.

Upload Settings
The Upload Settings allow you to configure and enforce file size quotas for each section. The quota applies to instructor-uploaded files like external media files and Personal Capture recordings. Section upload quotas let you limit the amount of total storage that can be used for these files.
Be advised that quota size includes the total of the processed AND completed media files (the /content AND the /flash folder on the file system), not just uploaded files. Take this into consideration when calculating quota allotments per section.
All upload settings are inherited from the organization. See Upload Settings for the organization for additional details about the settings.

Configure Publishers
The bottom of the Section page contains an Add Publisher button, that allows you to assign one or more publishers for the section.
After you add a publisher to a section in the ESS, you must still add the publisher's name for the course to each section. This means that you must:
- Find the publisher's name for the section. Each publisher has a different protocol and format for a section name.
- Add the publisher's name to the ESS.
For more information on this process, see our Publishing information.
After you add a publisher to a section, the publisher is listed, as shown in the following figure.
The table below describes the Configured Publishers settings.
Setting | Definition |
|---|---|
Name | This column displays the name and configuration information for the publisher. |
Publisher Type | This column displays the publisher type for the selected publisher. |
Configuration Complete? | This column displays the status of the configuration. It reads "Yes" if the section specific information for the publisher is entered and "No" if this information is not yet entered. Hover over the publisher and click the edit link to set the section specific information for the publisher. |
Add Publisher | This button opens the Add Publisher page. |
Delete a Section
When you delete a section, the following objects are also deleted, because they exist specifically for the section:
- All schedules associated with the section
- All Echoes associated with the section
The following objects are not deleted, as they exist independently of the section:
- Courses associated with the section
- Users associated with the section
- Security modules associated with the section
For technical details on what happens when you delete a Section, see Deleting Objects from the System.
Deleting Sections is Permanent.
Once you confirm to delete the section, the section and its associated schedules and Echoes are permanently deleted from the system. You cannot recover deleted sections, schedules or Echoes.
Procedure
- Navigate to Schedule > Courses. The Courses page appears.
- Click the course with the section you want to delete.
- Click the name of the section you want to delete.
- Scroll to the bottom of the page and click Delete.
- Check the box to confirm that you want to delete the section and associated objects.
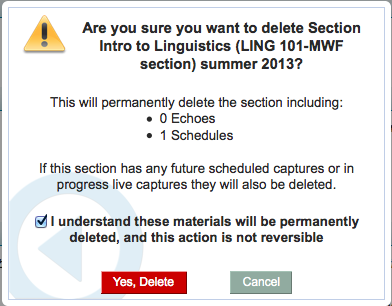
Click Yes, Delete.
- Notice the following:
- A message at the top of the page confirms that the item has been deleted.
- The section its associated objects are removed.
For technical details on what happens when you delete a Term and how to confirm complete deletion, see Deleting Objects from the System.