RSS Feeds
- Hannah Petty
In this section:
Overview
You can configure an EchoSystem Server (ESS) so it creates an RSS feed automatically when an Echo is ready for distribution.
Configuration consists of these phases:
- Creating the publisher module. The publisher module, which is the main component, defines how the publisher behaves when it is invoked. It appears at the system configuration level.
- Instantiating the publisher module for each section. Operating components ("instances") determine which Echoes invoke the publisher. They appear at the section and Echo levels. A section or Echo that makes use of a publisher module instantiates it.
System Settings determine the URL used for RSS feeds
The URL used for RSS Feeds is determined by the Application Network Settings configured in the System Settings page, and whether you are using an internal or an external web server. Briefly, the configurations work as follows:
- If you are using an internal web server, and serving "mixed content" (HTTPS for App/HTTP for Content, with or without reverse proxy), the Host Name and Port shown in the Content Network Settings are used for RSS feeds.
- If you are using an internal web server and using ALL HTTPS for serving content (with or without reverse proxy), the Legacy Content Host Name and Port (HTTP) are used for RSS feeds.
- If you are using an external web server, regardless of how you are serving the content, the Host Name and HTTP port listed in the Active Echo Settings section of the System Settings page are used for serving RSS feeds.
If you are having problems with RSS feeds, be sure to check the appropriate Host Name and Port settings on the System Settings page (keeping in mind that RSS feeds require the use of an HTTP port).
Create the Publisher Module
- Log in as an Administrator.
- Navigate to Configuration > Publishers.
- Click the Add button.
In the Publisher Details section, populate the fields as described in the following table.
Field Description Name Give the publisher a recognizable identifier
Remember This Name
You will need this name when instantiating the publisher.
Description Optional Organization Select the organization from the drop-down list Publisher Type Select RSS Feeds from the drop-down list Use by Default Check this box if you want all new sections created to instantiate this publisher.
- This means that new sections are automatically publicized via RSS feeds.
- You still have to instantiate the publisher for existing sections
- In the Enclosure Metadata section, choose the descriptive information that will appear with each entry in the generated RSS feed.
In the Publisher Configuration section, populate the fields as described in the following table.
Field Description Create Audio Podcast Feed Check to create an audio podcast feed Create Enhanced Podcast Feed The Enhanced Podcast product was supported through EchoSystem 3.0. Check this box if you will be using this RSS feed to distribute Echoes made with EschoSystem 3.0 or earlier. Create Vodcast Feed Check to create a video podcast feed Language Enter the language code for the represented country's language. See the following Microsoft MSDN library page for a list: http://msdn.microsoft.com/en-us/library/ms533052%28v=vs.85%29.aspx. Title Template Name of the RSS feed. It appears as the feed identifier in the Web browser or feed reader. The built-in variables
%course,%section, and%termexpand to the actual values for the course, section, and term.Publish for all Sections in Course and Term If disabled, the generated feed will contain only Echoes from the section instantiating the module.
If enabled, the generated feed contains all Echoes from the entire course of the section instantiating the publisher (basically combining the feed for all sections of the course). In this case, the
%sectionvariable in the title template does not function.- In the ITunes Group section, use the checkbox to select whether to Enable iTunes Tags for sections published through this RSS feed. iTunes tags are items that appear in the iTunes RSS interface for the broadcast section and are configured on the Edit Section page if this RSS Publisher is selected. See Instantiate the Publisher Module immediately below for Instructions on adding iTunes tags.
- Click Save.
Instantiate the Publisher Module
- Log in as an Administrator.
- Navigate to Schedule > Courses.
- Click the name of a course containing a section to be published. The Course Details page appears, listing the course's sections at the bottom of the page as shown in the figure below.
- Hover over the section you want to publish.

- Click the edit button. The Edit Section page appears.
- Near the bottom of the page, click Add Publisher in the Configured Publishers area.
- In the box that appears, select the publisher module name you created earlier, as shown in the figure below.

Select the Allow iTunes Subscription box if you want to allow iTunes users to receive the RSS feed from within the iTunes application.
If the selected RSS Publisher has enabled iTunes tags, an iTunes Group section appears, shown in the following figure. These fields are recommended but optional, and relate to how iTunesU presents information on the section to users.
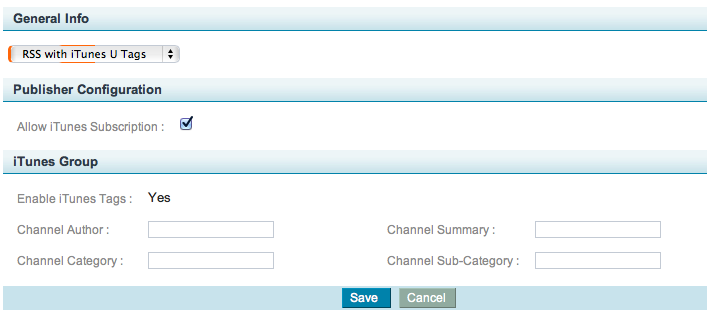
The table below describes the field information requested, as indicated on Apple's iTunesU website for Podcast and RSS feed specifications: http://www.apple.com/itunes/podcasts/specs.html#rss. All fields are limited to 255 characters, except for Summary which is limited to 4000.Field Name Description/Use Channel Author Appears in the "Artist" column. Indicates the author or organization responsible for the content, such as the organization or academic department to whom the section belongs. Channel Summary Provides a description that appears separate window when the "circled i" in the Description column is clicked. It also appears on the iTunes page for your podcast. Channel Category Appears in the "Category" column and for iTunes Browse feature, allowing users to find the podcast. There are two ways to browse podcast subject categories on iTunes: Click Browse under Features at the bottom of the iTunes Store window or select a category from the Podcasts pop-up menu in the navigation bar. See http://www.apple.com/itunes/podcasts/specs.html#categories for a complete list of supported Categories and Sub-Categories.
Channel Sub-Category Functions like Channel Category but allows for further narrowing of the subject matter or material covered in the podcast.
See http://www.apple.com/itunes/podcasts/specs.html#categories for a complete list of supported Categories and Sub-Categories.
- Click Save.
- Notice that the RSS Feed URLs appear at the top of the page.

- On the Edit Section page, click Save again.
- To immediately use the URLs produced by the publisher, click the title of any Echo, instantiating it from the Echoes list in your ESS. The URLs for the chosen products are listed at the top of the page. If you configured other publishers (Moodle, Blackboard, and so on), these publishers advertise the presentation URLs in their publications.